
[vc_row][vc_column][vc_single_image image=”14582″ img_size=”full” add_caption=”yes” alignment=”center” css=”.vc_custom_1508136238204{background-position: center !important;background-repeat: no-repeat !important;background-size: cover !important;}”][/vc_column][/vc_row][vc_row wrap_type=”in_container”][vc_column][vc_tta_accordion color=”white” active_section=”1″ collapsible_all=”true” no_fill=”true”][vc_tta_section title=”How do I access tutorials?” tab_id=”1484860192041-6769b3cd-4098″][vc_column_text]Please go to the top left corner where says “FAQ” as in the capture below.
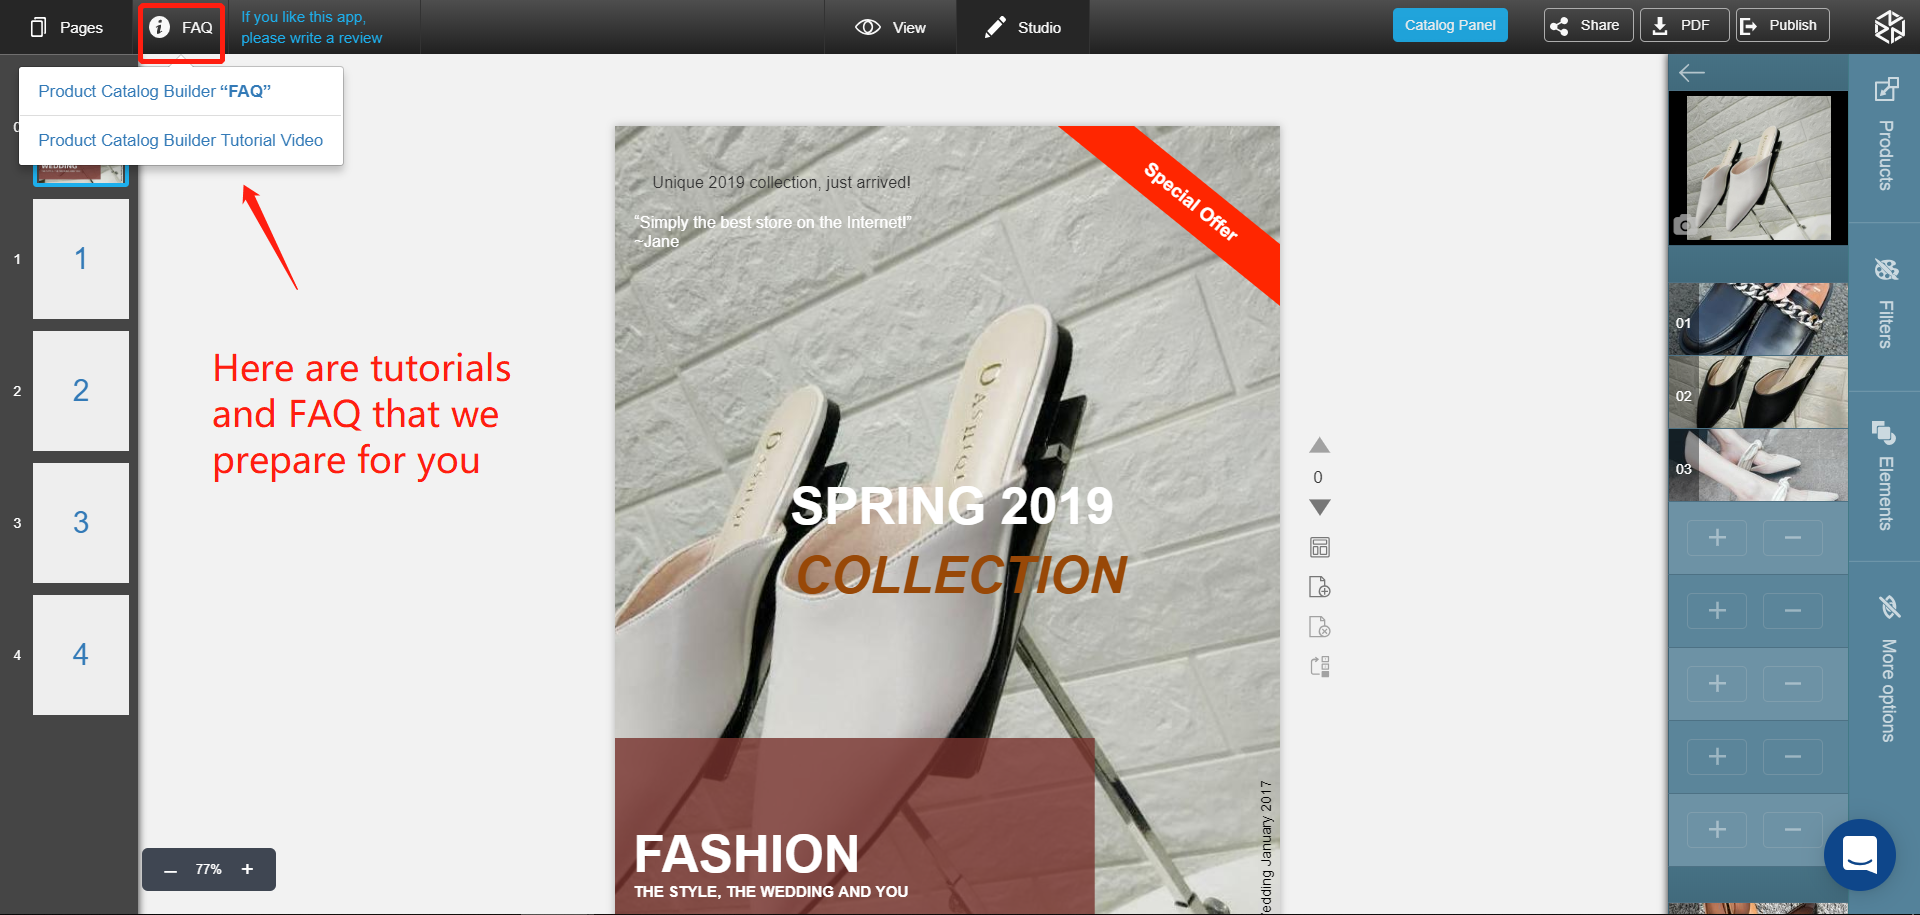
[/vc_column_text][/vc_tta_section][vc_tta_section title=”How to import / sync product and collection?” tab_id=”1550595169684-f6721ede-0acc”][vc_column_text]
- Please go to Dashboard –> Import / Sync Product as shown in the capture
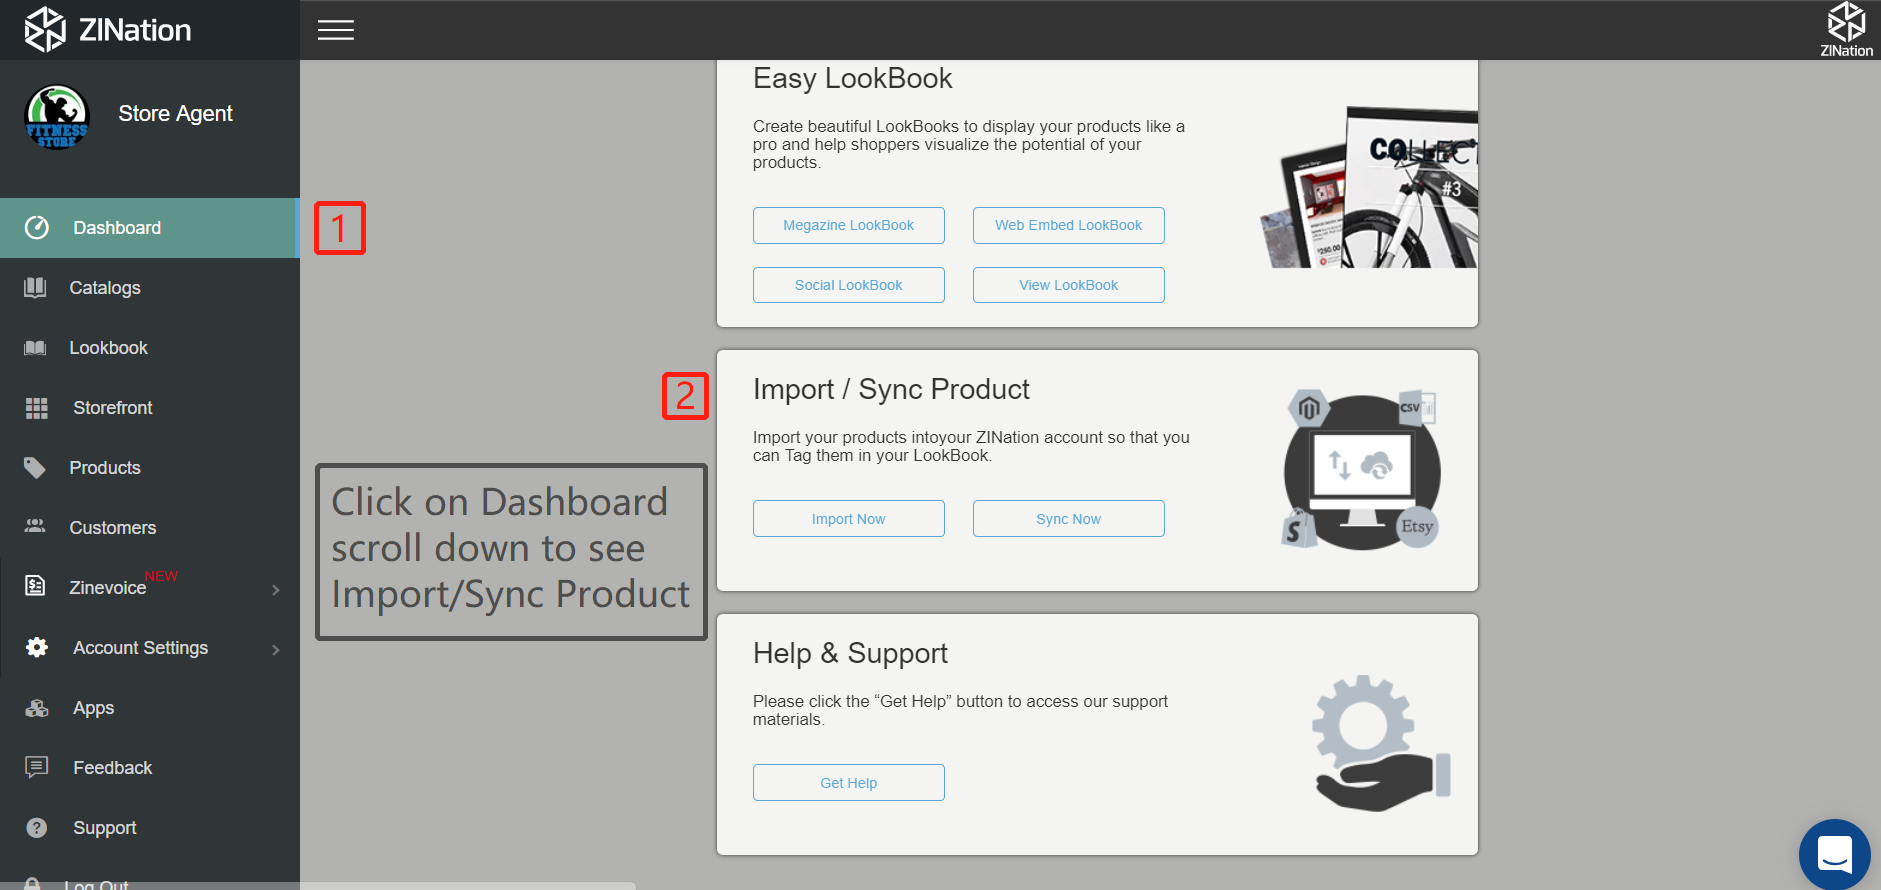 [/vc_column_text][/vc_tta_section][vc_tta_section title=”How do I import products without a Shopify store?” tab_id=”1484765585823-7a35f053-3316″][vc_column_text]• In your Dashboard scroll down to Import / Sync Products
• Download the Sample CSV Template and add all your products to the template, save your CSV file
• Choose CSV File and Browse your computer for the correct file
• If you want to overwrite all the products that are already in your account with the products on the CSV that you are uploading, check “Overwrite existing products that have the same handle.
• You can also add one product at a time to your account by going to My Products from your Dashboard and clicking on Add Product[/vc_column_text][/vc_tta_section][vc_tta_section title=”How can I create large catalog automatically on the fly?” tab_id=”1489421455239-8e5d4abf-cd04″][vc_column_text]• Click on create a Catalog Automatically
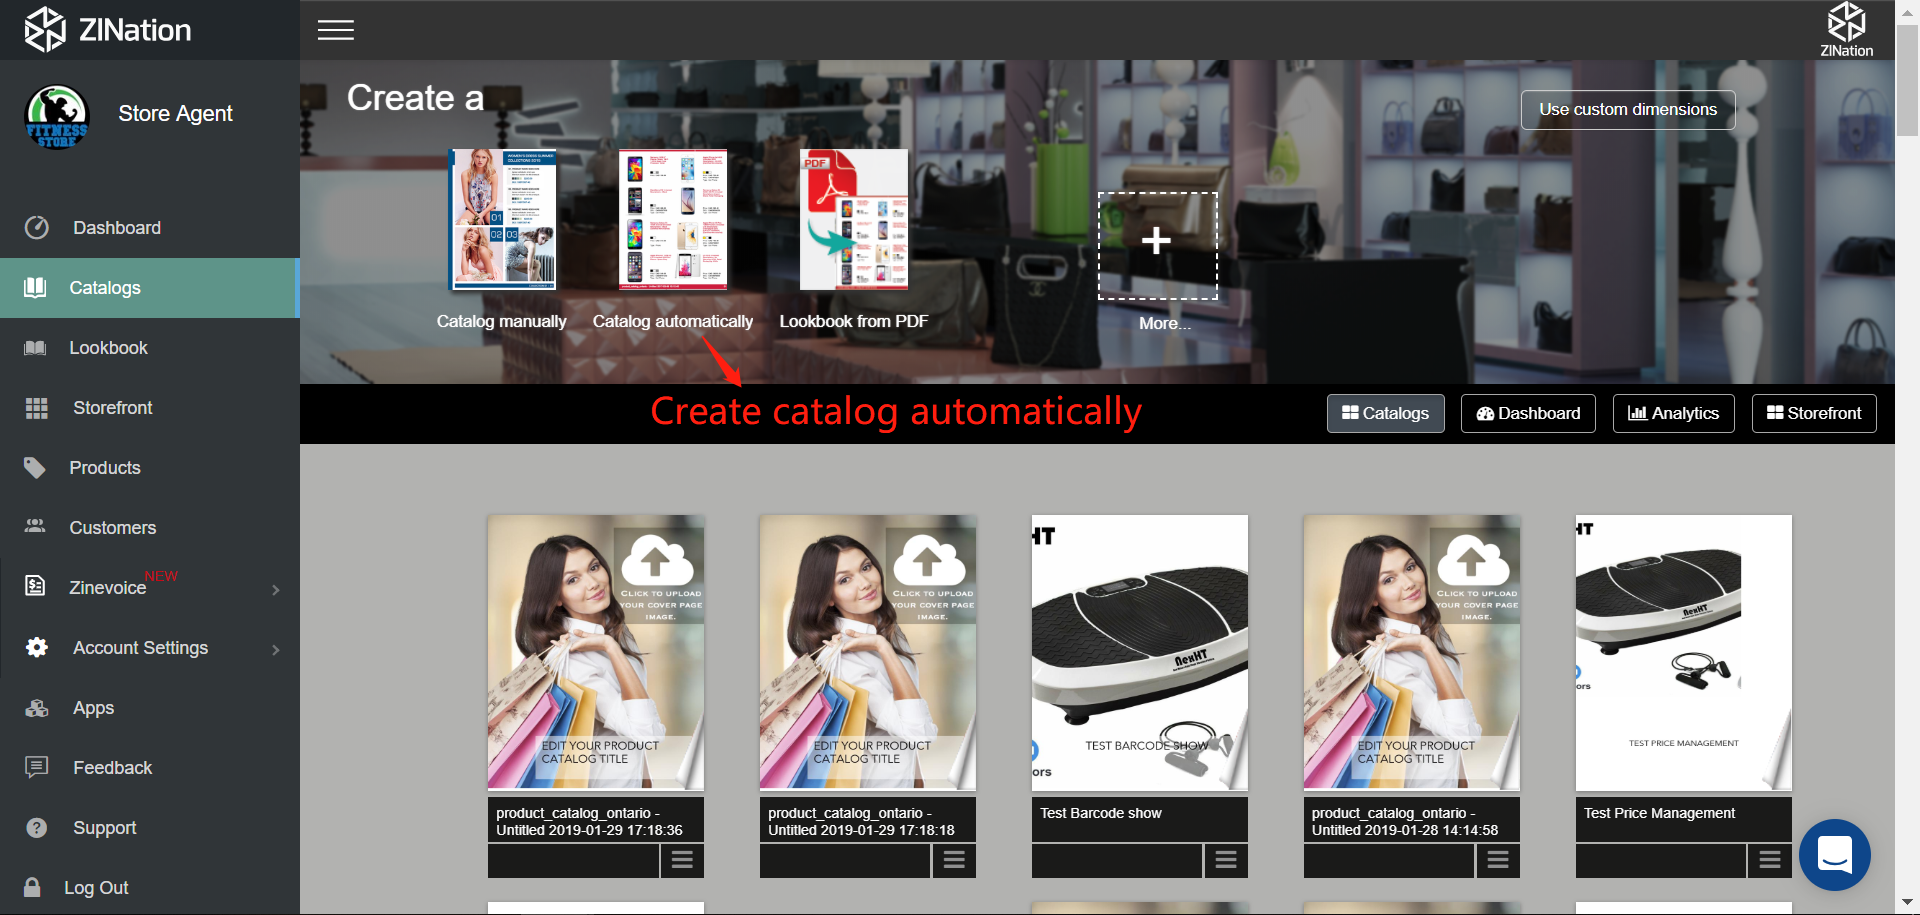
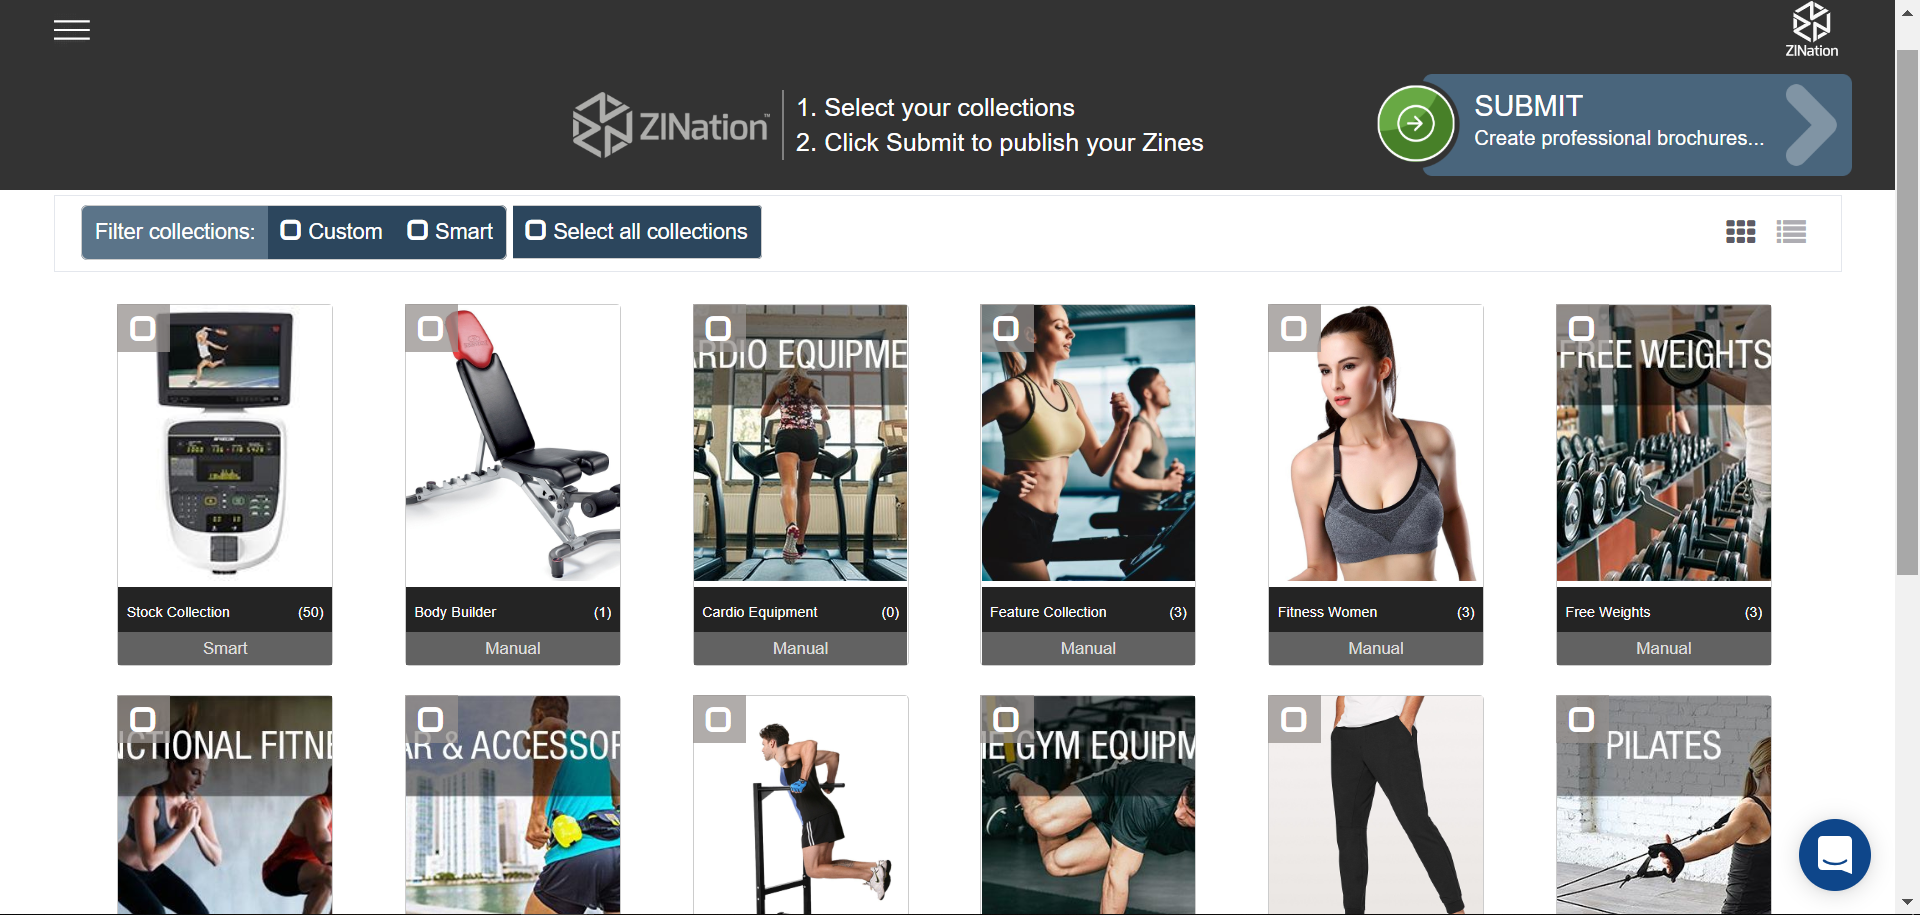
• You will be brought to a page that displays all your collections in your Shopify store, check which collection(s) you would like to display in your catalog (you can select all if you would like to include all your collections), then click Submit
• You will be prompted to add a catalog Title and choose a Template, and Sort the products, then click Create
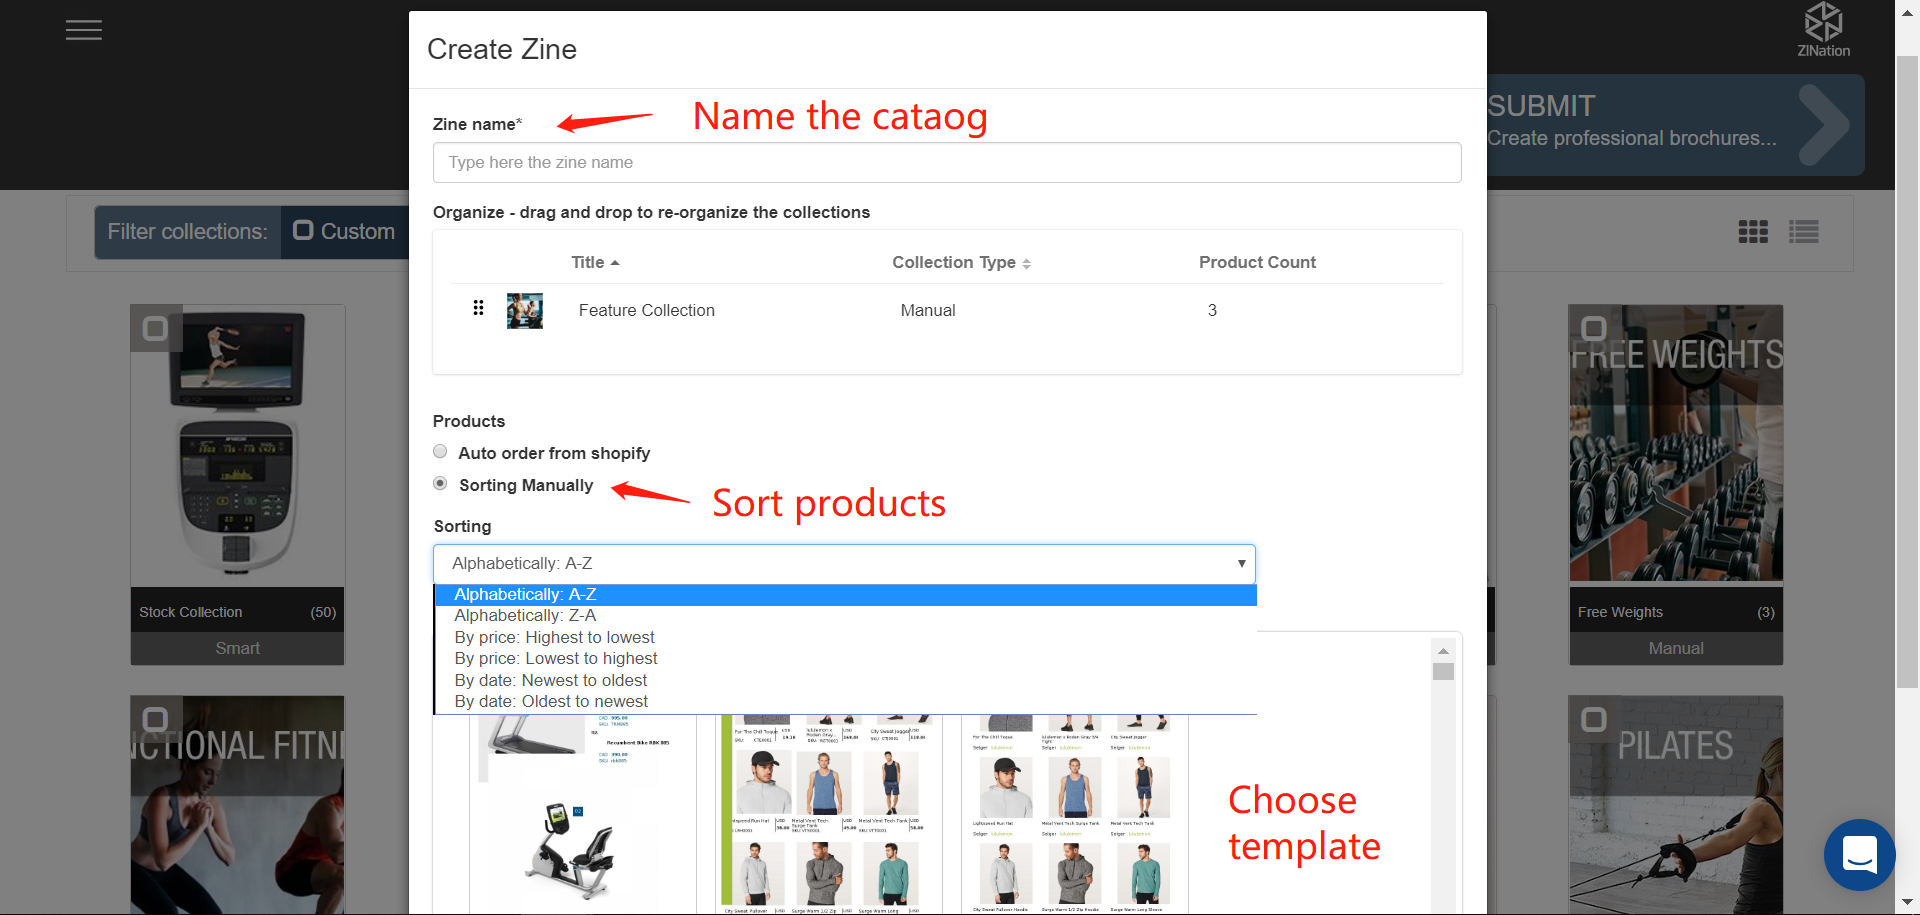
• Your catalog is created and you will be brought to the Studio where you can make Customization to your catalog – to learn how to manually edit in Studio click here
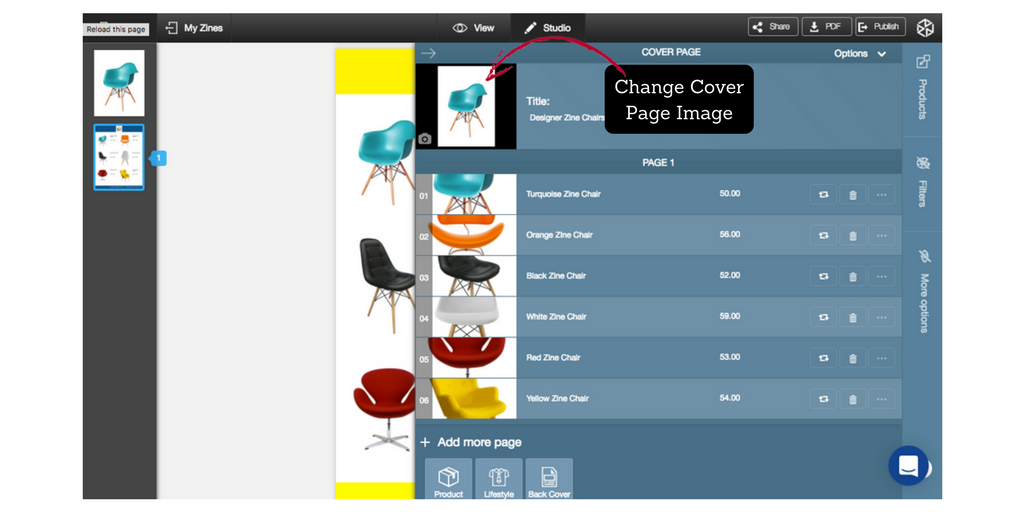
• Your first product image will by default become the image on your Cover Page (you can change this image by clicking on “Change Image” on the Cover Page
• Your collections (if you have selected more than one) will be separated in your catalog (they will be on their own respective pages)
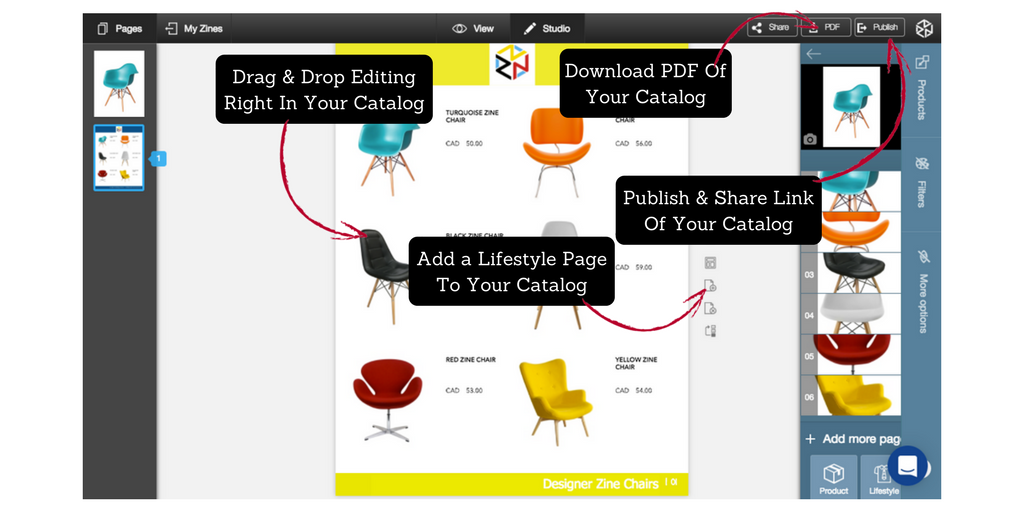
• You can add Lifestyle pages anywhere within your catalog by scrolling to the spot in your catalog you would like a Lifestyle page to be added, and clicking the Add a New Page icon and choosing one of the Lifestyle Templates
• When you are satisfied with your catalog, you can either share the catalog link with customers by clicking on Publish or you can download the PDF of your catalog to print by clicking on PDF – to learn more about Publishing and Sharing, click here
Please see tutorial here https://bit.ly/2Kv83B7[/vc_column_text][/vc_tta_section][vc_tta_section title=”How do I create a catalog by manually selecting products?” tab_id=”1484769605366-2f1e38ed-8ff0″][vc_column_text]• At the top of your Dashboard, choose Create a Catalog Manually
• You will enter the Studio and a sample catalog comprising of one Cover Page, two Product Pages and one Back Cover Page will be created for you using some of your products
• You can edit the products in your catalog by deleting, moving or adding products
• You can change the template of the page by clicking on the “change layout” icon to the right of each page
• You can change the Filter across your entire catalog by opening the Filter tab on the far right – changing the filter applies one template to all the pages of your catalog
• To add a page to your catalog, click on the “add page” icon on the right of the page you wish for your new page to come after – here you can toggle between Product or Lifestyle layouts
• NOTE: The Layouts highlighted in green are editable using Drag & Drop[/vc_column_text][/vc_tta_section][vc_tta_section title=”How do I get support quickly from a ZINation team member?” tab_id=”1489679032421-2cadf3fd-00c3″][vc_column_text]
Live support is available through the chat at the bottom right corner of your screen Monday to Friday 9am-5pm EST. Just write your question as a reply to any message or any team member, and we will get back to you as quickly as possible. Otherwise, you can also email us at support@zination.com for further enqueries. [/vc_column_text][/vc_tta_section][vc_tta_section title=”Can I use ZINation without a Shopify or Magento store?” tab_id=”1484938999338-69205c8d-3c2a”][vc_column_text]
- Anyone can use ZINation – Go to Get Started to sign up for the App and subscription that is right for you
[/vc_column_text][/vc_tta_section][vc_tta_section title=”What are the dimensions of a the page?” tab_id=”1484860414796-bdb415e8-a8bf”][vc_column_text]
- Each portrayal page has a format of 612 x 792 in pixels while landscape templates are 792 x 612 in pixels – any other combination of the same ratio will work
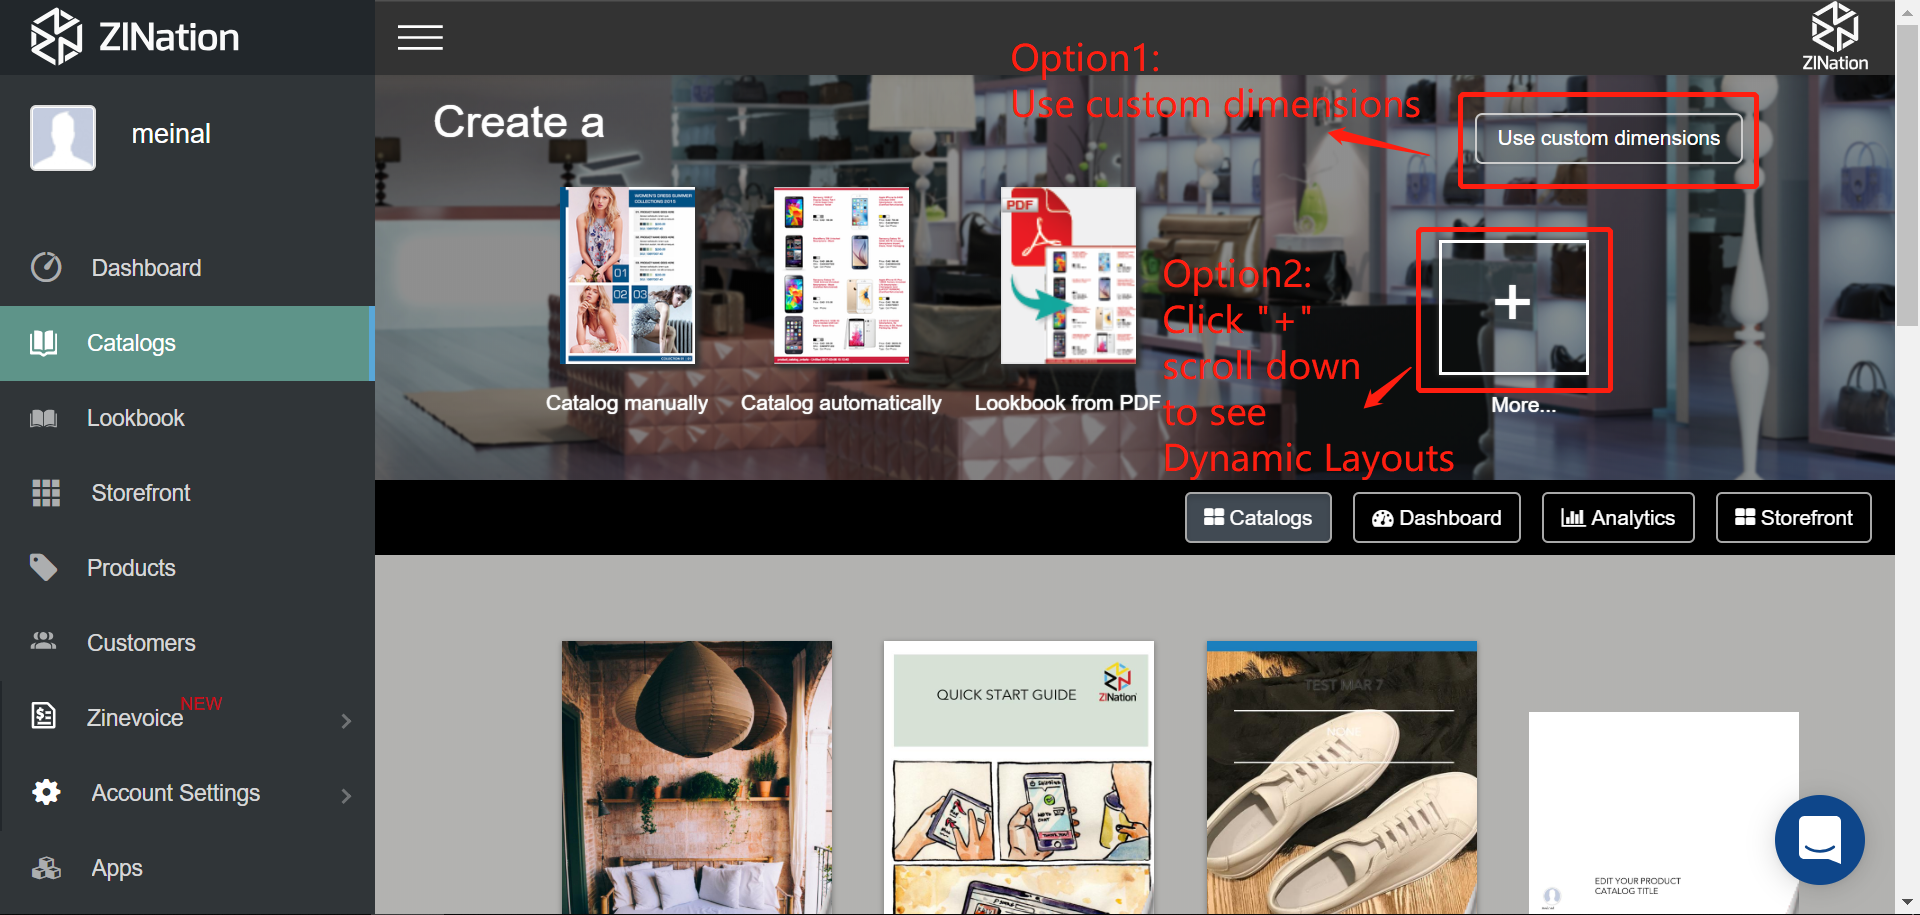
- You may also use custom dimensions and create your own layout by clicking on ” custom dimensions ” at the top right corner as well.
[/vc_column_text][/vc_tta_section][vc_tta_section title=”How do I add products to my catalog?” tab_id=”1484769700354-64b616c4-f876″][vc_column_text] • After adding a Product page to your catalog, open the My Products tab (If you have a Shopify store, be sure to Sync All Products BEFORE you create a new catalog) and check which products you would like to include in the catalog
• Note: you can select all products or choose Collections of products
• Once you’ve chosen the products, click Apply Now[/vc_column_text][/vc_tta_section][vc_tta_section title=”How do I add/create new product or edit product info / add variants to existing product in the app?” tab_id=”1551370227784-3530c6ff-cc59″][vc_column_text] • Please click on “Products” at the left sidebar
• Click on “Add Product” at the top right corner, or click on the product name to add variant or change the info
• Edit product info and click on “Save Product” at the bottom
Please note: you can also edit product info or add variants to existing product by clicking the product name[/vc_column_text][/vc_tta_section][vc_tta_section title=”How do I delete product or text in the page?” tab_id=”1484770363814-7d790e95-cf92″][vc_column_text]• You can click on the product or text and delete by the trash icon appears at the top right corner
• You can simply drag the product or text out of the page to delete[/vc_column_text][/vc_tta_section][vc_tta_section title=”How do I find a product image or element that I’ve dragged off my catalog page?” tab_id=”1489602064836-8a222399-4256″][vc_column_text]If you dragged an image or element off the catalog page and cannot find it, you can reset that page back to its original design by doing the following:
• Change the layout for that page (only that page) by selecting the “Change this page layout” icon to the right of the page and choosing any other layout – this will bring your images and elements back to the page
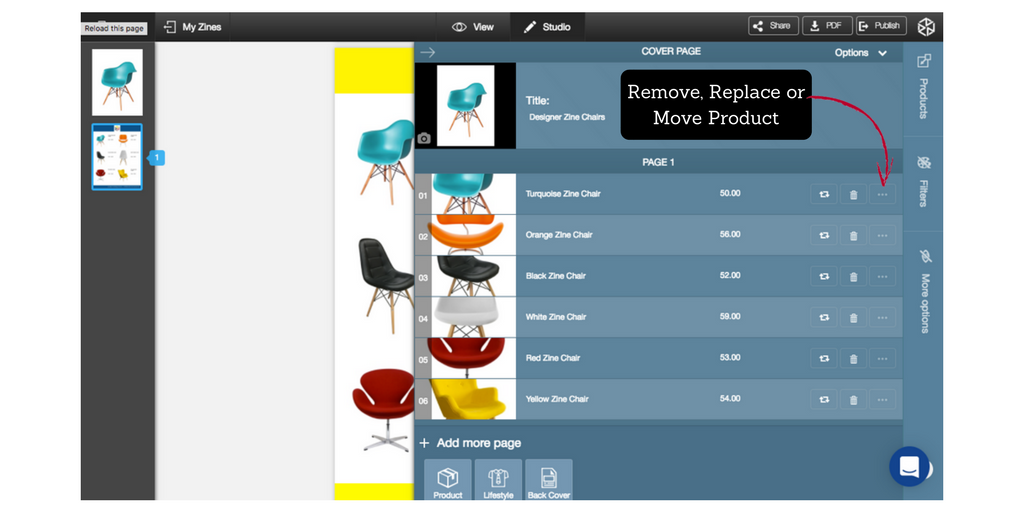
• Once the new layout has loaded, you can change the layout again, back to the original layout you were working on[/vc_column_text][/vc_tta_section][vc_tta_section title=”How do I remove, replace or move a product in my catalog?” tab_id=”1484770307950-d0289631-b52e”][vc_column_text]• When in your Studio creating or editing a catalog, click the arrow to pull out the tab that manages your catalog pages
• Click on the trash can icon or the three white dots (…) beside the trash can icon
• You can also move and resize a product image using Drag & d=Drop right in your catalog when you’re in your Studio editing or creating a catalog
Please see tutorial here https://youtu.be/ncqNwEaXGZk[/vc_column_text][/vc_tta_section][vc_tta_section title=”How do I move a catalog page to a different spot in my catalog?” tab_id=”1484939711790-4df7cd47-ca21″][vc_column_text]
- While creating or editing a catalog in your Studio, click on the “move this page” icon to the right of the catalog page and drag the page to a new spot in your catalog
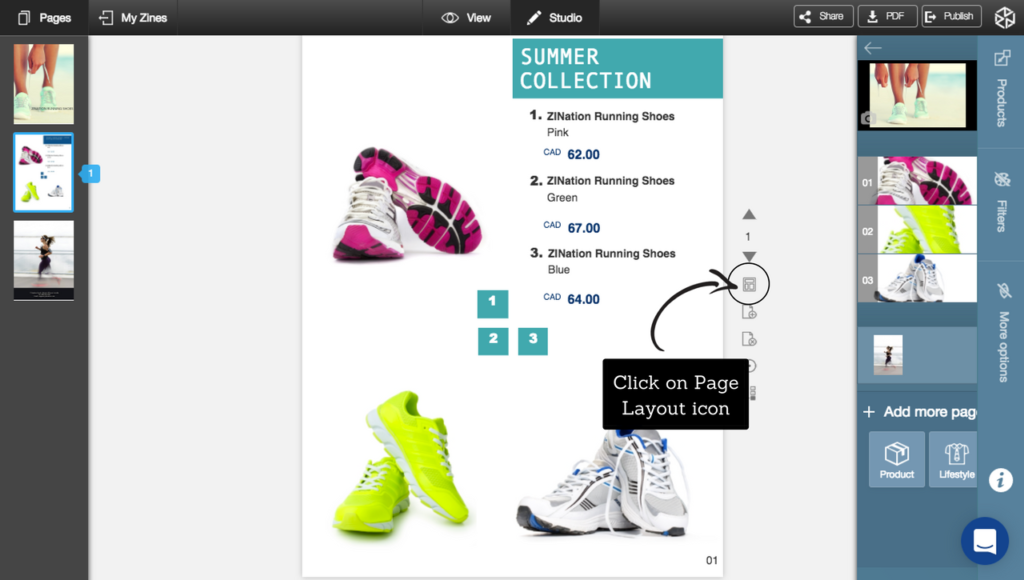
[/vc_column_text][/vc_tta_section][vc_tta_section title=”How do I show variants in the catalog?” tab_id=”1484773643928-04dd041e-894a”][vc_column_text]• Please click on the first icon “Page Layout” at the right side of the catalog in the Studio
• Choose the template that shows variants info (please see the capture as example)
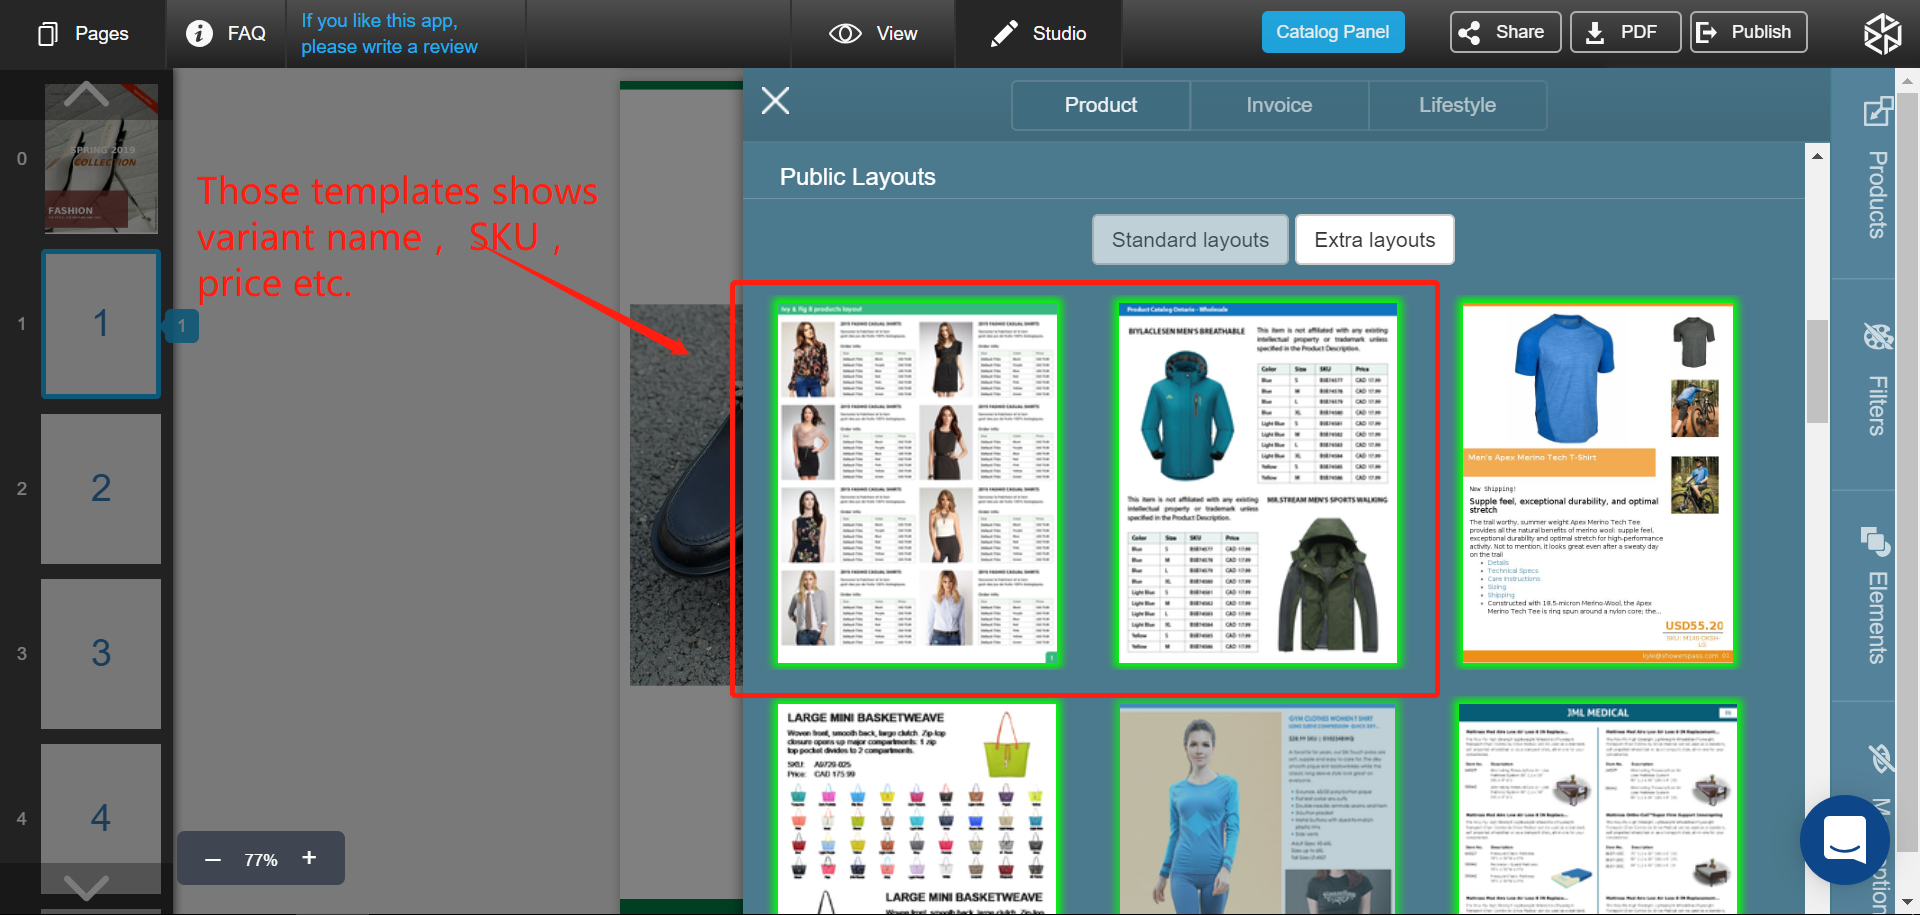
[/vc_column_text][/vc_tta_section][vc_tta_section title=”How do I rename the catalog?” tab_id=”1551371689122-a78dd629-c94e”][vc_column_text]• While creating or editing a catalog in your Studio, click on the arrow to pull out the tab that manages your catalog pages
• Click on the default Title on the Cover Page and edit your Title
• You can also edit your Title right in your catalog Cover Page by clicking on the title text[/vc_column_text][/vc_tta_section][vc_tta_section title=”How do I hide description?” tab_id=”1554997544965-70737a0e-f12e”][vc_column_text]Please note that “Hide Description” will only hide the format of description from the online store instead of the description itself.
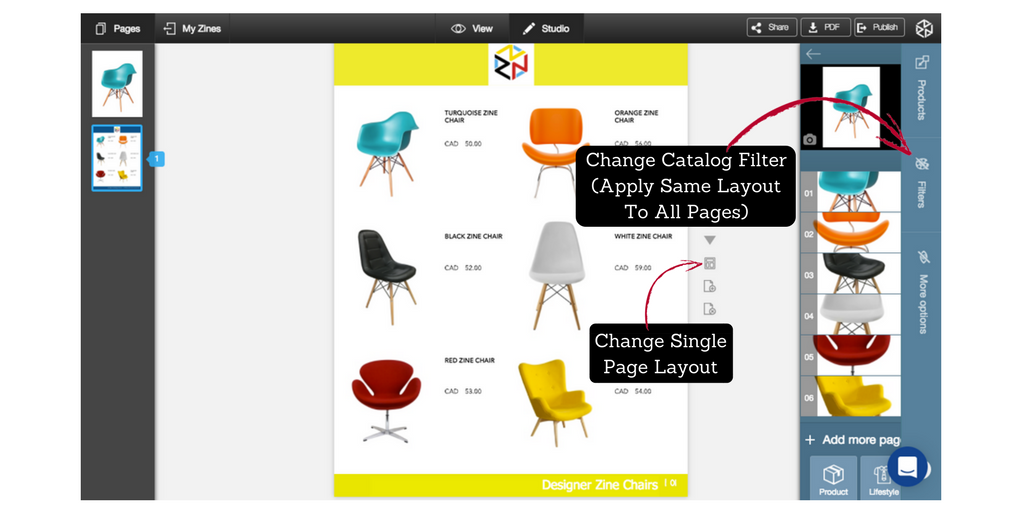
To really hide the description in the catalog, you can drag description text box out of the page and save the page as custom layout. Then you can apply the custom layout to other pages or the whole catalog. (detailed instructions are stated below)[/vc_column_text][/vc_tta_section][vc_tta_section title=”How do I change the Layout of my catalog pages?” tab_id=”1484769935059-082de855-7b2c”][vc_column_text]• You can change the Layout for each individual page by clicking the “layout” icon to the right of your page, OR you can change the Filter across your entire design by opening the Filter tab on the right side of your screen (Changing the Filter will apply the Layout to all of your catalog pages)
 [/vc_column_text][/vc_tta_section][vc_tta_section title=”How do I create a Custom Layout and apply it to other pages?” tab_id=”1492533656159-42ee22bd-8633″][vc_column_text]• Customize any Drag & Drop enabled Layout to suit your catalog and branding needs (resize images and elements, change colors and fonts)
• Click on the Page Layout icon to the right of the page you’ve completed customizing
• Click on the Manage icon in the My Custom Layouts section
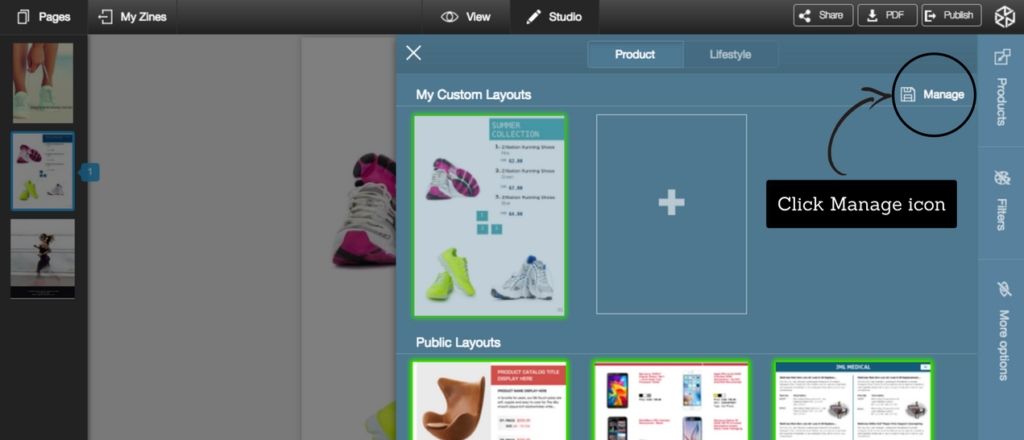
• Give your Custom Layout a name and choose “Save current page as new custom layout”
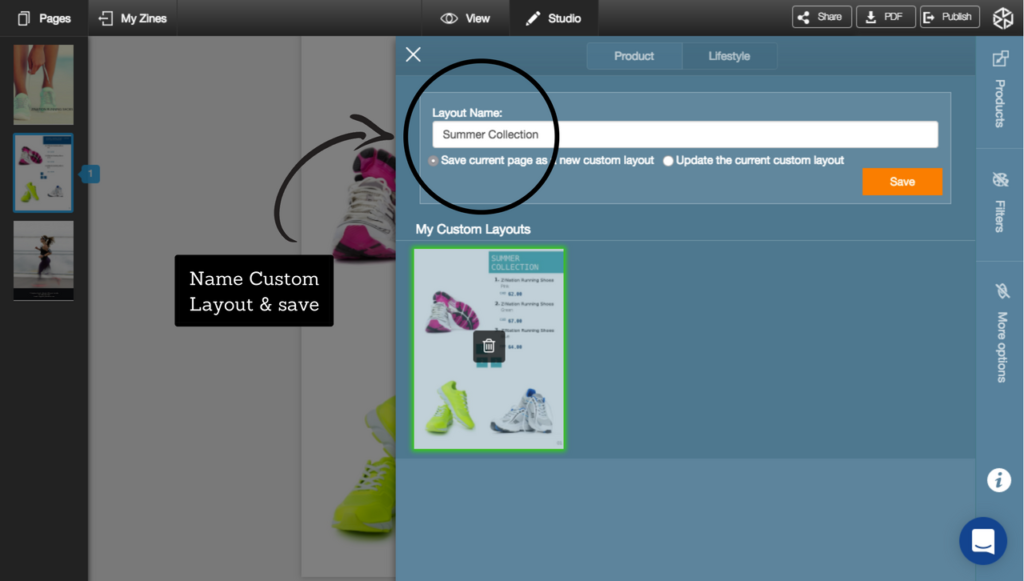
• If you’re just making an adjustment to a previously saved Custom Layout, choose “Update the current custom layout”
• You can now either manually change any of your catalog pages to your new Custom Layout or click on the Filter tab and apply your Custom Layout to your entire catalog in one click
Please see tutorial here https://bit.ly/2LhY9Hr[/vc_column_text][/vc_tta_section][vc_tta_section title=”How do I create a custom page layout using Product Layout?” tab_id=”1554827934822-0c0903d4-6231″][vc_column_text]
- Create a new catalog using Custom Dimensions or Dynamic Layouts. Please note the width and height should be no bigger than 2000 pixels
- Add a blank page by clicking on the second icon on the right side next to the page. Then go to Elements on the right sidebar and open Product Layout. Select the one you like and click on it, one product box will be added to the page for each click.
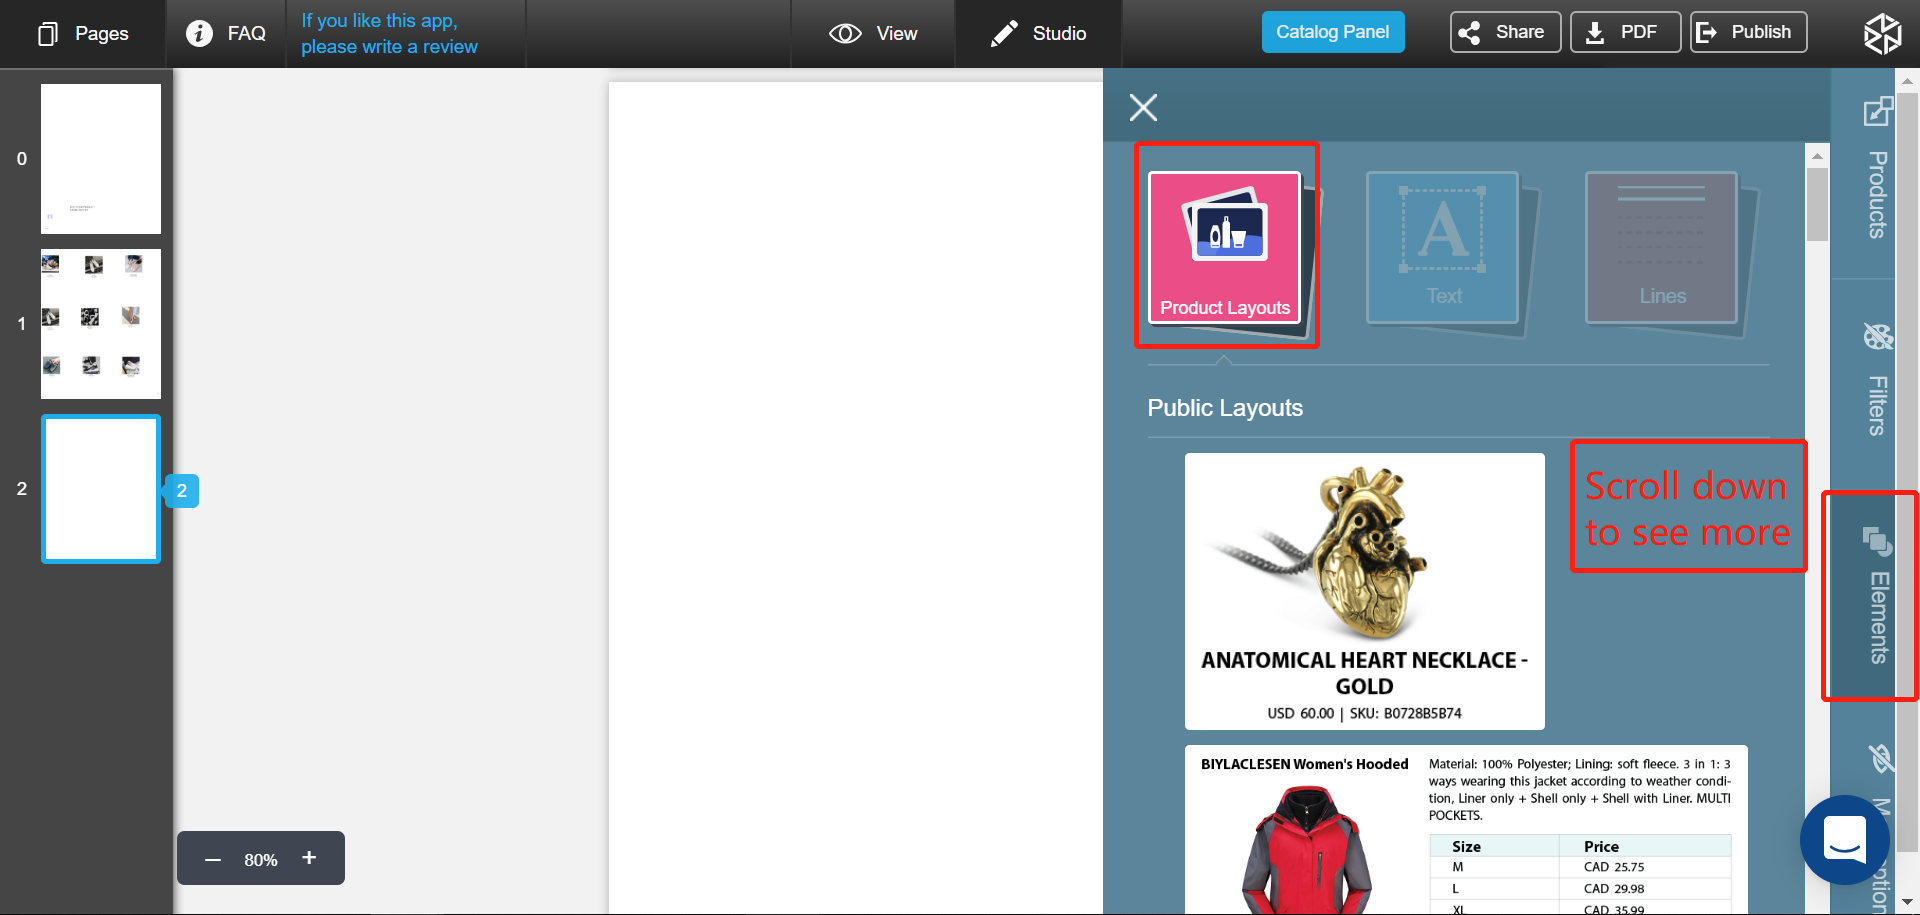
- After that, you can re-size and re-position each product box and customize font size to make the page look exactly the same as you want.
- Finally, save it as a custom layout. Then you can apply it to existing catalog or create a new catalog using that template.
[/vc_column_text][/vc_tta_section][vc_tta_section title=” How do I change the color of elements in my catalog?” tab_id=”1489505297897-6e4c82de-7e8a”][vc_column_text]When in your Studio creating or editing a catalog, click on an element you want to change then click on the color block at the top right to edit the color[/vc_column_text][/vc_tta_section][vc_tta_section title=”How do I create a back cover page for my catalog?” tab_id=”1484770636535-d71f78dc-d7fc”][vc_column_text]• When in your Studio creating or editing a catalog, click on the arrow to pull out the tab that manages your catalog pages
• Choose the Back Cover icon at the bottom of the page
• You will be prompted to choose the Layout of your Back Cover Page
• To add an image to your Back Cover Page click on the grey box that says “No Image” and upload an image
• To add text to your Back Cover Page click on the text below your Back Cover Page image and edit the text[/vc_column_text][/vc_tta_section][vc_tta_section title=”How do I include an Order Form in the PDF catalog?” tab_id=”1550591471730-4ed2cd85-26d3″][vc_column_text]• In Studio: Catalog Panel –> WHOLESALE –> Show Order Form in PDF –> Apply
Please note the order form is only shown in PDF. If you’d like to use your own form or show it in online version, please add a blank page in the catalog and use Elements –> Text to copy & paste the form in the new page.[/vc_column_text][/vc_tta_section][vc_tta_section title=”How do I create a cover page for my catalog?” tab_id=”1484770510873-0e4519c3-60ea”][vc_column_text]• When in your Studio creating or editing a catalog, an empty Cover Page will be created for you automatically
• To choose the Layout of your Cover Page click on the “layout” icon beside the Cover Page and choose your desired Layout
• To add an image to your Cover Page, click on the arrow to pull out the tab that manages your catalog pages
• Click on the camera icon on the thumbnail of your Cover Page image and upload an image[/vc_column_text][/vc_tta_section][vc_tta_section title=”How do I show Barcode in my catalog?” tab_id=”1489506319151-59053b88-2859″][vc_column_text]In studio, More Option –> Zine Page –> Product Bar Code –> Show –> Apply.
Please note you need to choose one of those tempates that support barcode:
- efue 8 products big title (Drag & Drop)
- efue 8 producs (Drag & Drop)
- Flash learn 8 Products (Drag & Drop)
- Flash learn 2 Products (Drag & Drop)
- Ivy & Fig 8 products (Drag & Drop)
- data sheet alexandra (Drag & Drop)
- data sheet vancouver (Drag & Drop)
- static_blank_layout
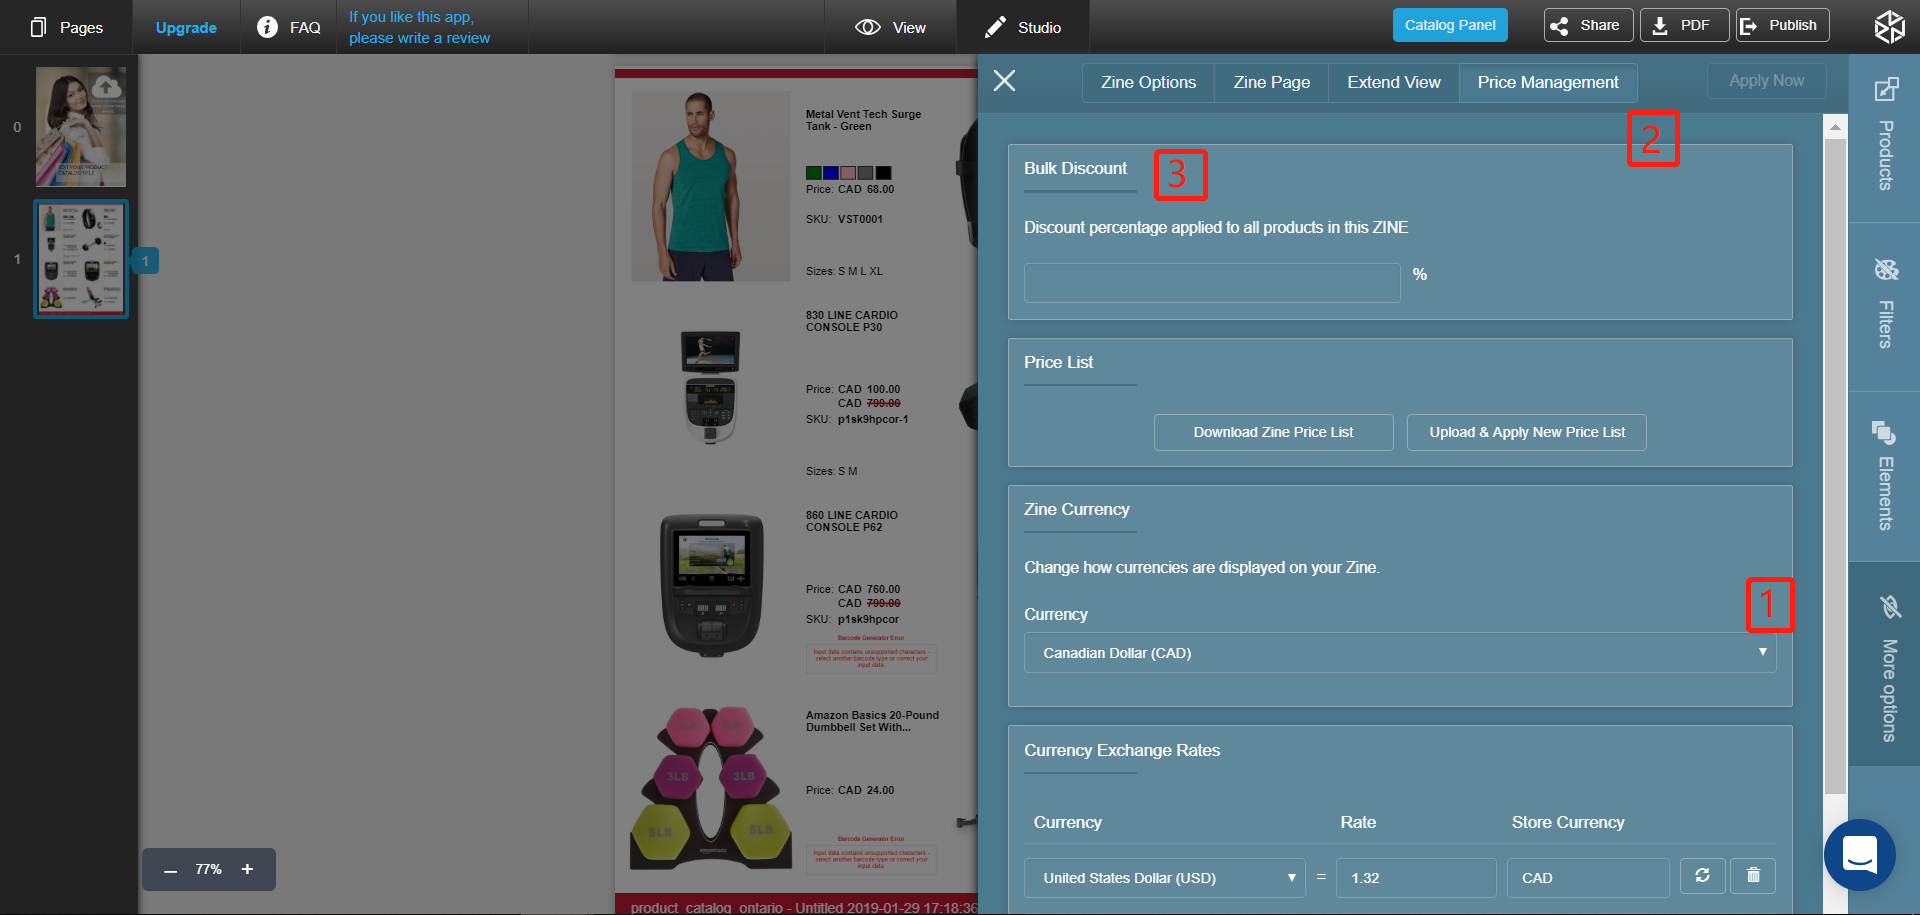
[/vc_column_text][/vc_tta_section][vc_tta_section title=”How do I hide prices in my catalog?” tab_id=”1550592035223-3a1d3158-47de”][vc_column_text]While creating or editing a catalog in Studio, open the More Options tab on the right and choose ZIne Page then change Product Price to Hide[/vc_column_text][/vc_tta_section][vc_tta_section title=”How do I show both retail and wholesale prices in the catalog?” tab_id=”1554827749937-0f48b1d7-898e”][vc_column_text]Please select the templates that support two prices, or you can create your custom page template using Product Layout through Elements.[/vc_column_text][/vc_tta_section][vc_tta_section title=”How do I use custom pricing (bulk discount) for wholesale? ” tab_id=”1484770748091-f7b91f4c-5ad1″][vc_column_text]• Click on More Options –> Price Management
• Enter your percentage discount and click Apply Now
IMPORTANT: If you are using an App for your Shopify store that offer Bulk and Automated Price Changes, there is an action you must take in your ZINation App to prevent all your customers from seeing your Wholesale prices.
• From your Dashboard click on the three white dashes at the top left and choose Apps
• On your ZINation App click on the down-facing arrow and choose Settings
• Add any tag words you don’t want ZINation to recognize as Variants such as “Wholesale”
Please see tutorial here https://youtu.be/1-GZkz5UWo0[/vc_column_text][/vc_tta_section][vc_tta_section title=”How do I use custom pricing (price list) for wholesale? ” tab_id=”1550593275450-e4ac59c2-c7bc”][vc_column_text]• Click on More Options –> Price Management
• Download the price list, change prices in the file, then upload the file, all prices will be updated in the catalog
Please note it’s better to use Microsoft Office to edit the file.
IMPORTANT: If you are using an App for your Shopify store that offer Bulk and Automated Price Changes, there is an action you must take in your ZINation App to prevent all your customers from seeing your Wholesale prices.
• From your Dashboard click on the three white dashes at the top left and choose Apps
• On your ZINation App click on the down-facing arrow and choose Settings
• Add any tag words you don’t want ZINation to recognize as Variants such as “Wholesale”
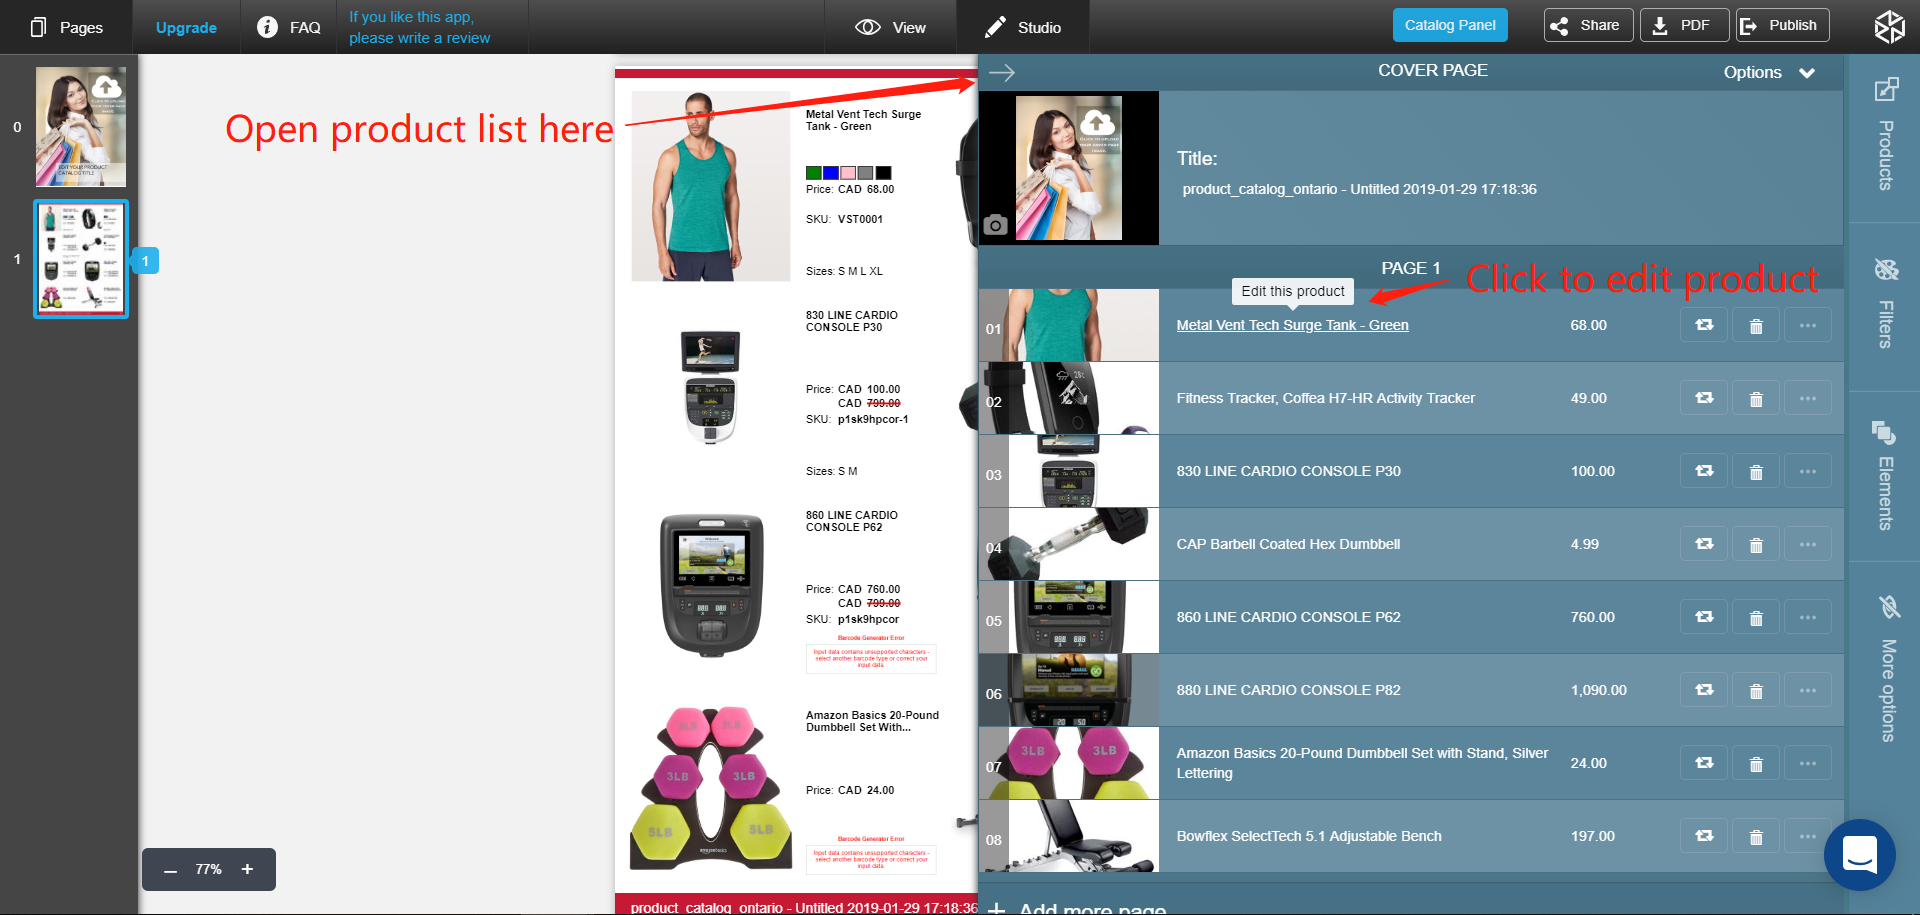
Please see tutorial here https://youtu.be/Y02dd1iS3RY[/vc_column_text][/vc_tta_section][vc_tta_section title=”How do I use custom pricing (individual item) for wholesale? ” tab_id=”1550593515435-f6a9afd4-2795″][vc_column_text]• Click on the arrow at the top right corner to open the product list in the catalog
• Click on the title of the product while in your Studio and scroll down to Variants
• Click on Edit and change the price to the wholesale price
• Click Save
• You can also edit the price of your products right in your catalog page by clicking on the price and changing the number
IMPORTANT: If you are using an App for your Shopify store that offer Bulk and Automated Price Changes, there is an action you must take in your ZINation App to prevent all your customers from seeing your Wholesale prices.
• From your Dashboard click on the three white dashes at the top left and choose Apps
• On your ZINation App click on the down-facing arrow and choose Settings
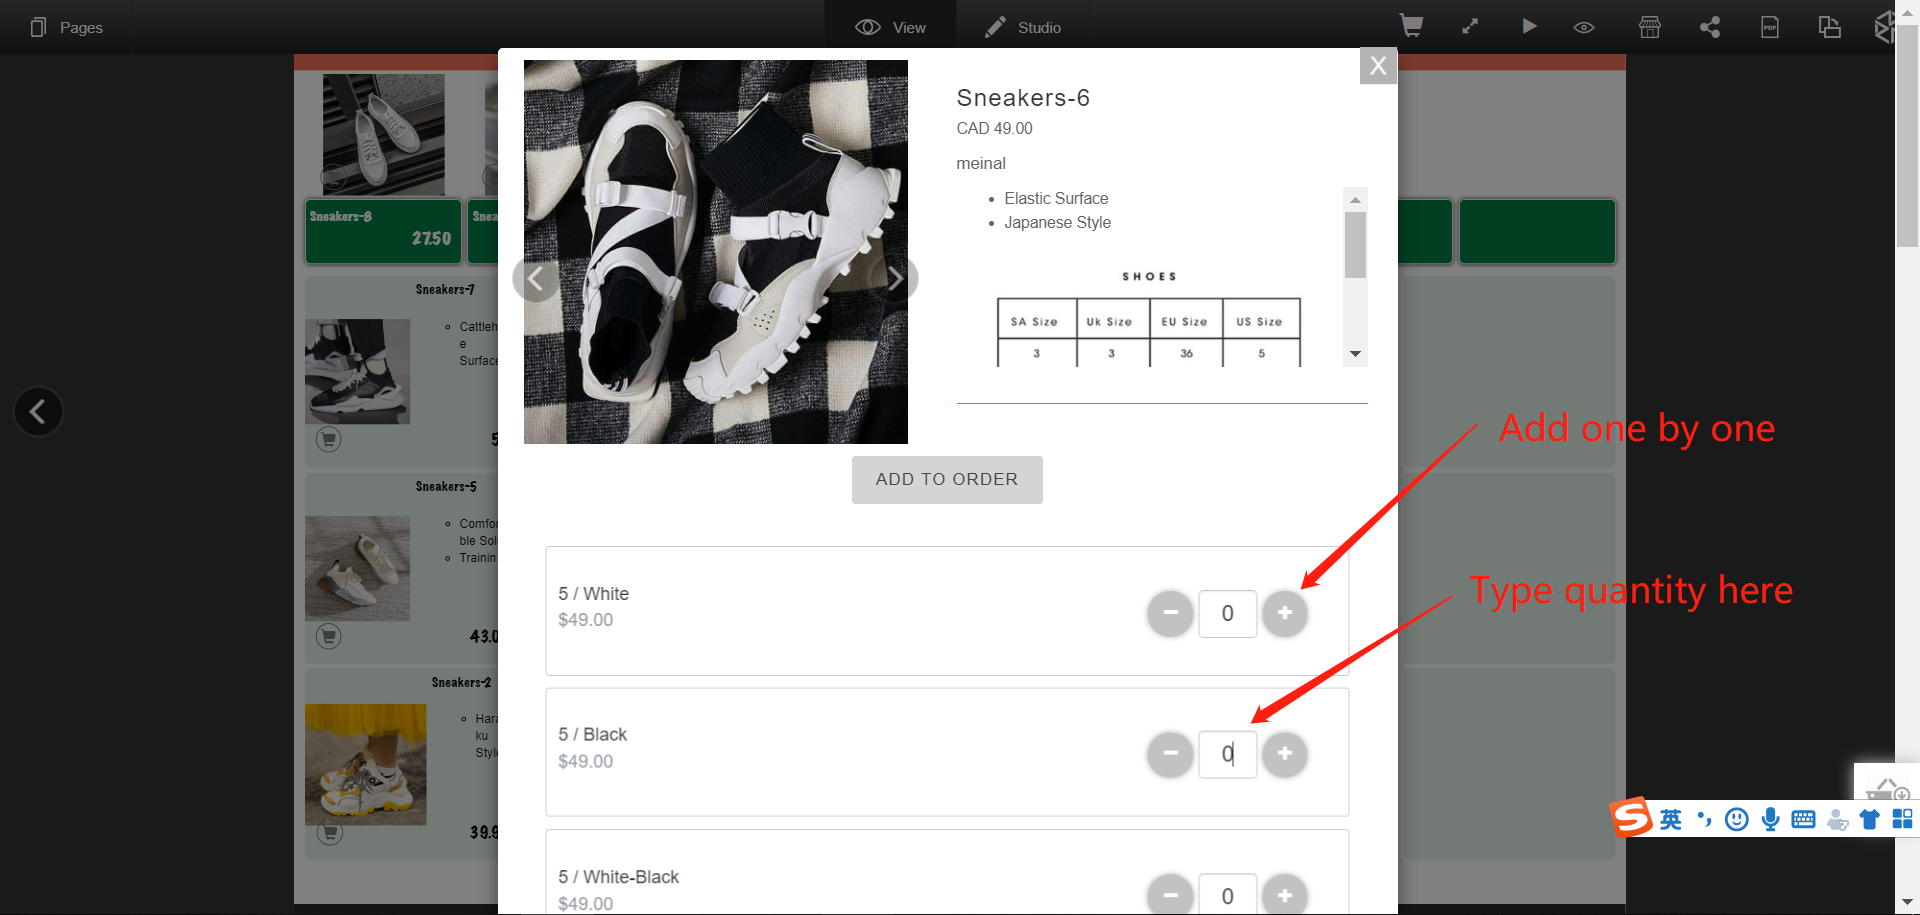
• Add any tag words you don’t want ZINation to recognize as Variants such as “Wholesale”[/vc_column_text][/vc_tta_section][vc_tta_section title=”How do customers add products to cart in large quantities?” tab_id=”1548966917015-5062b202-8dd0″][vc_column_text]In the Add to Cart page, customers can add product by clicking on “+” button or type the quantity they want in the middle box.
[/vc_column_text][/vc_tta_section][vc_tta_section title=”How do I set quantity of minimum order?” tab_id=”1550594451530-f471776f-147d”][vc_column_text]• Open product list by clicking the arrow, then click on the product name, scroll down to see the “edit” button for each variation
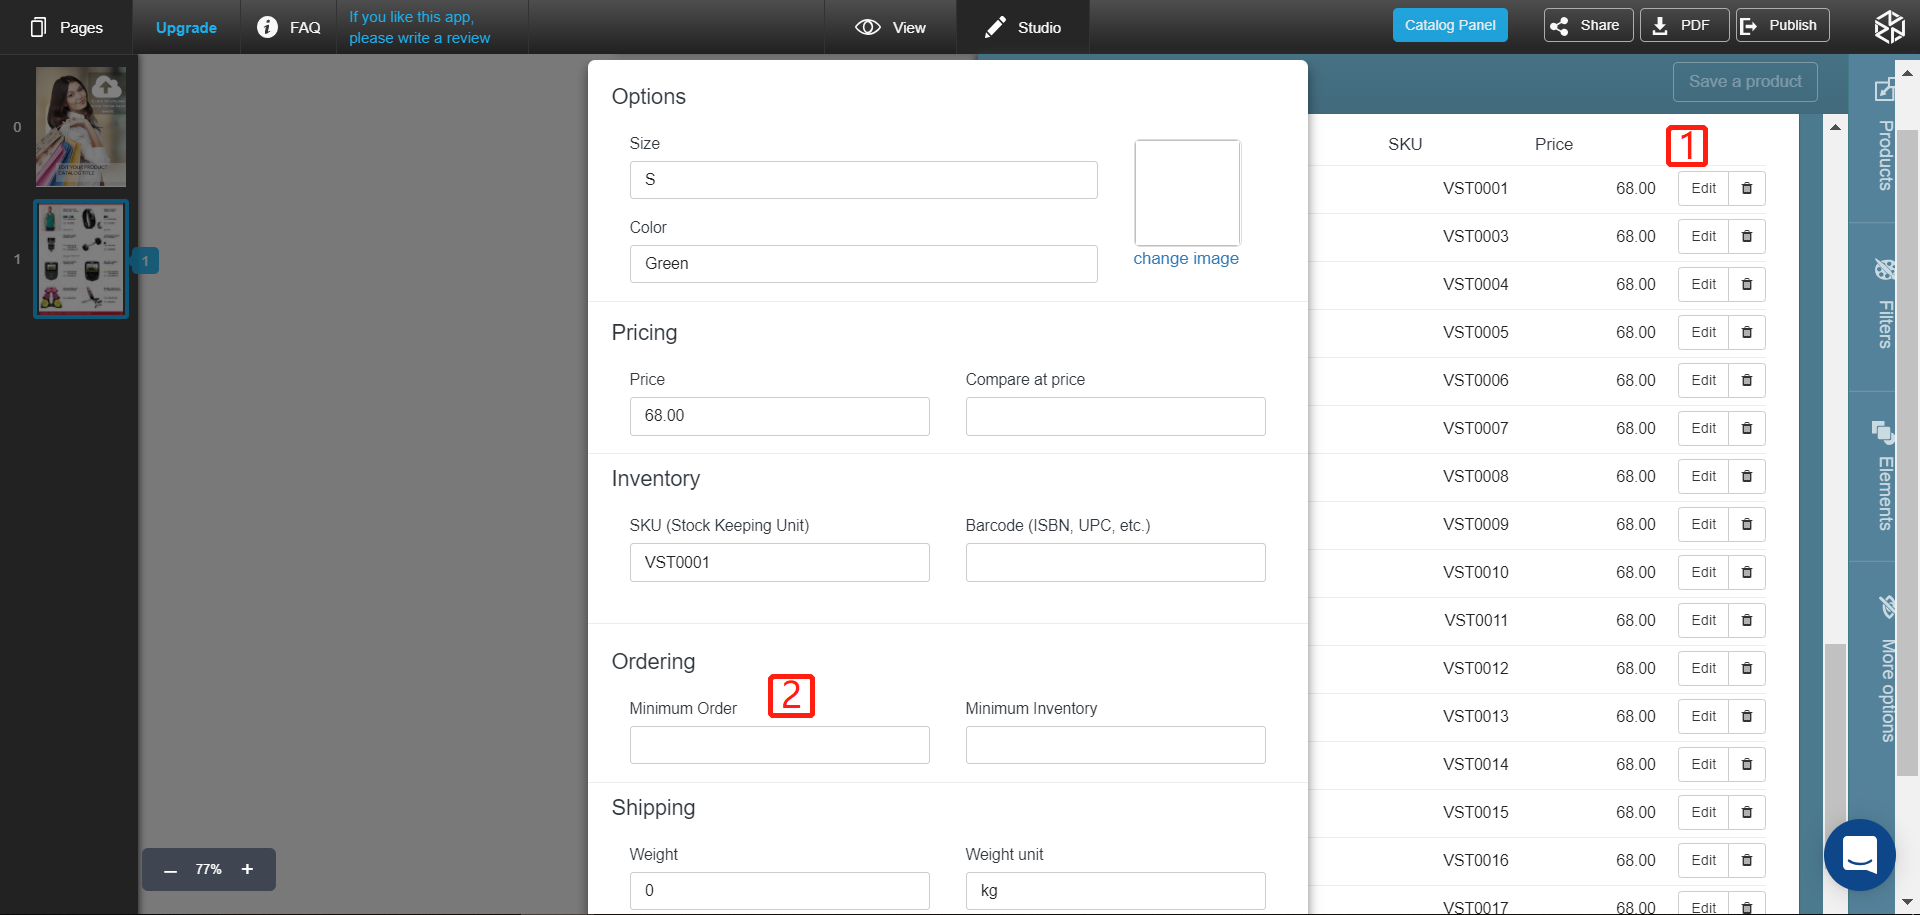
[/vc_column_text][/vc_tta_section][vc_tta_section title=”How do I show inventory?” tab_id=”1548967319986-06555558-d55c”][vc_column_text]First, please check to allow Shopify track your inventory
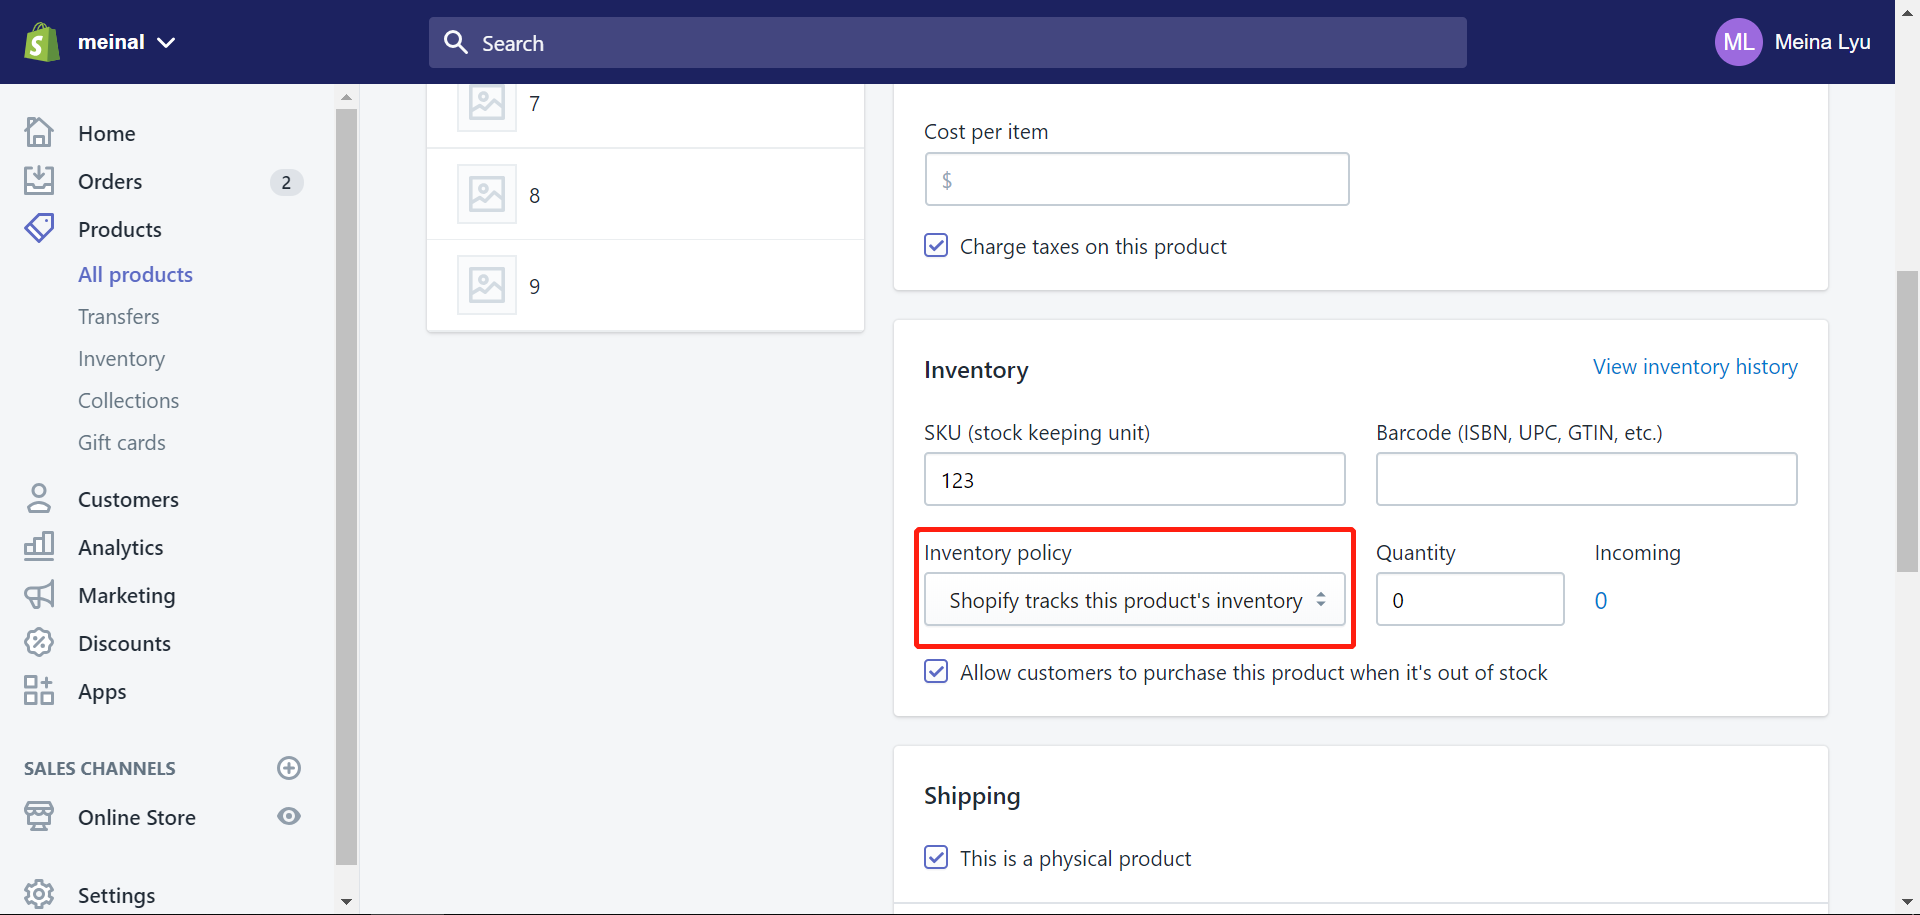
Then, click on Catalog Panel –> Shoppable –> Show Inventory –> Apply
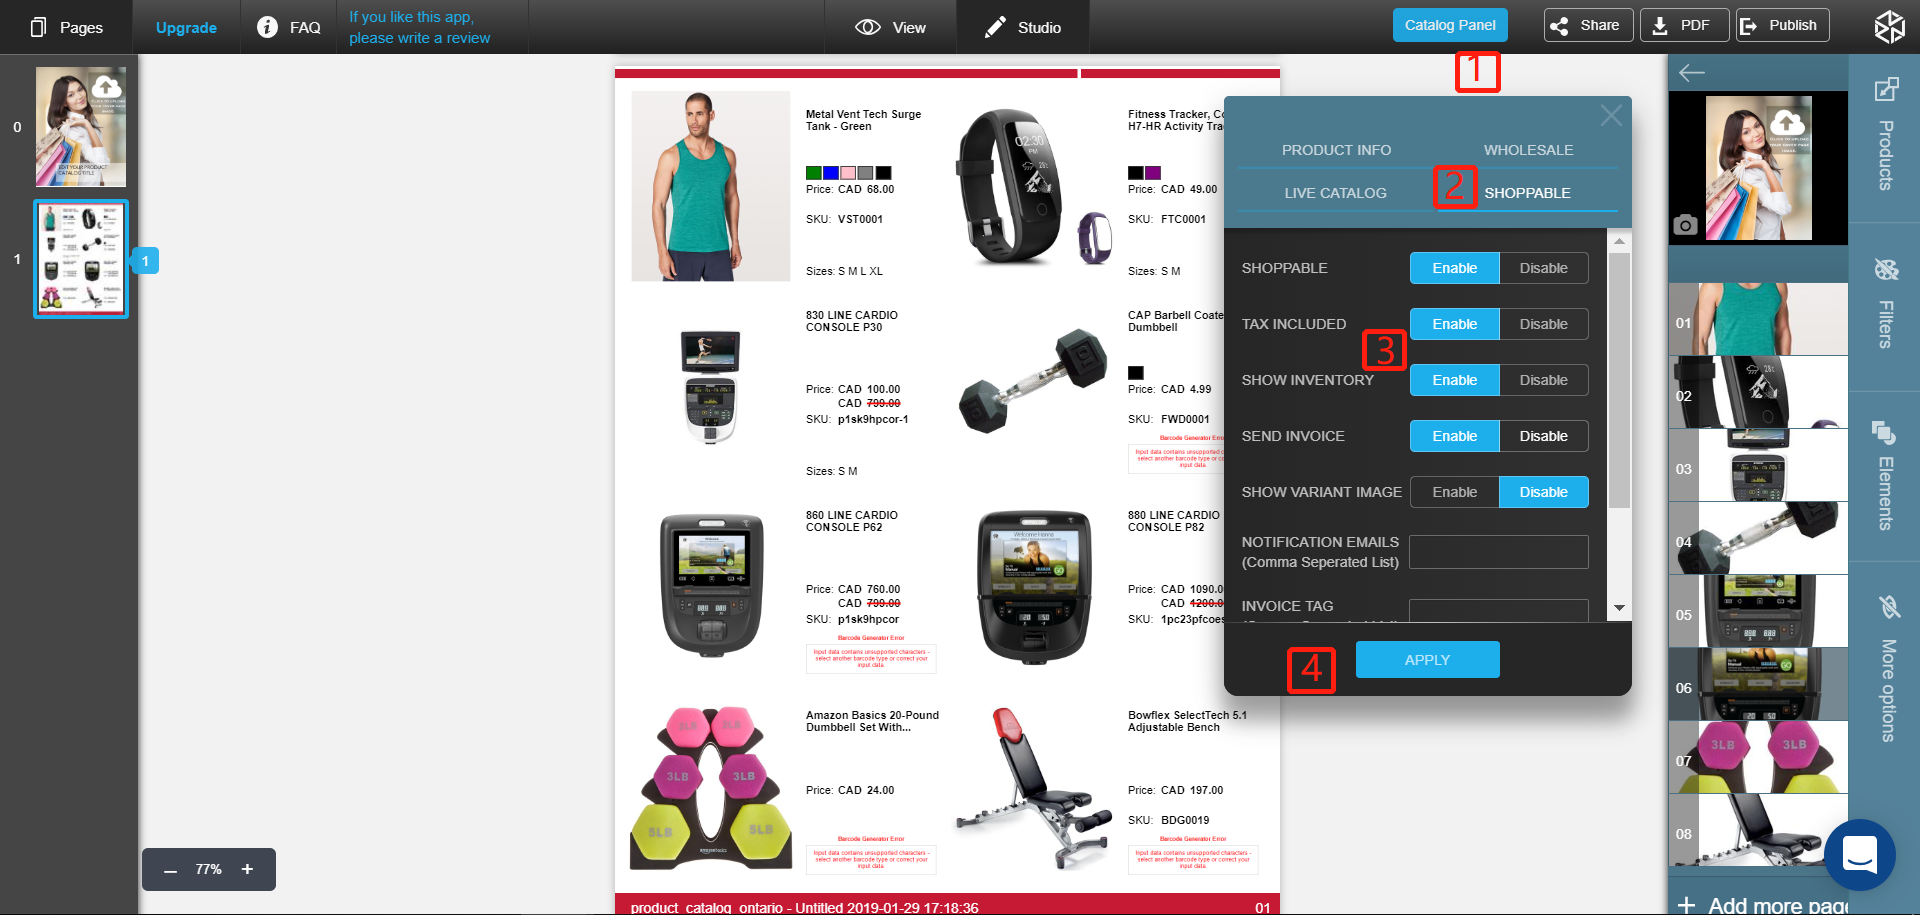
After that, you can switch to View Mode to see the inventory. Please note the inventory will shown when customer select a product to add to cart.
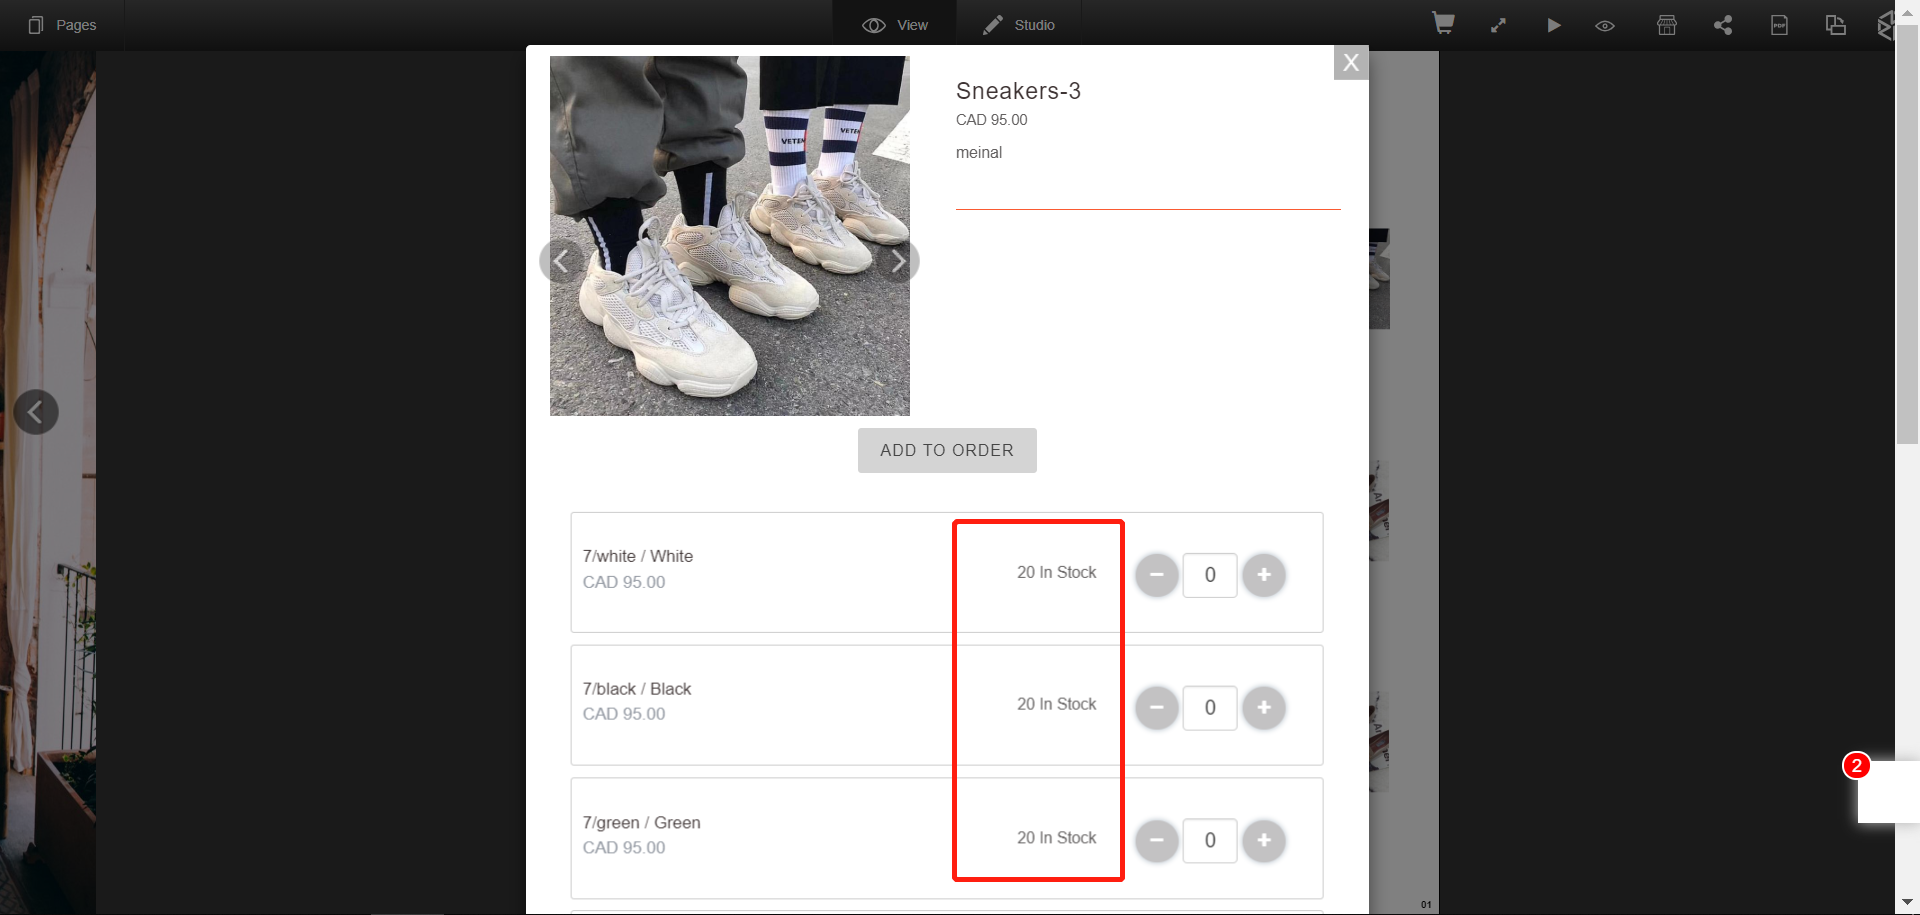
Please note: the inventory will change when the order is confirmed/paid/fulfilled.
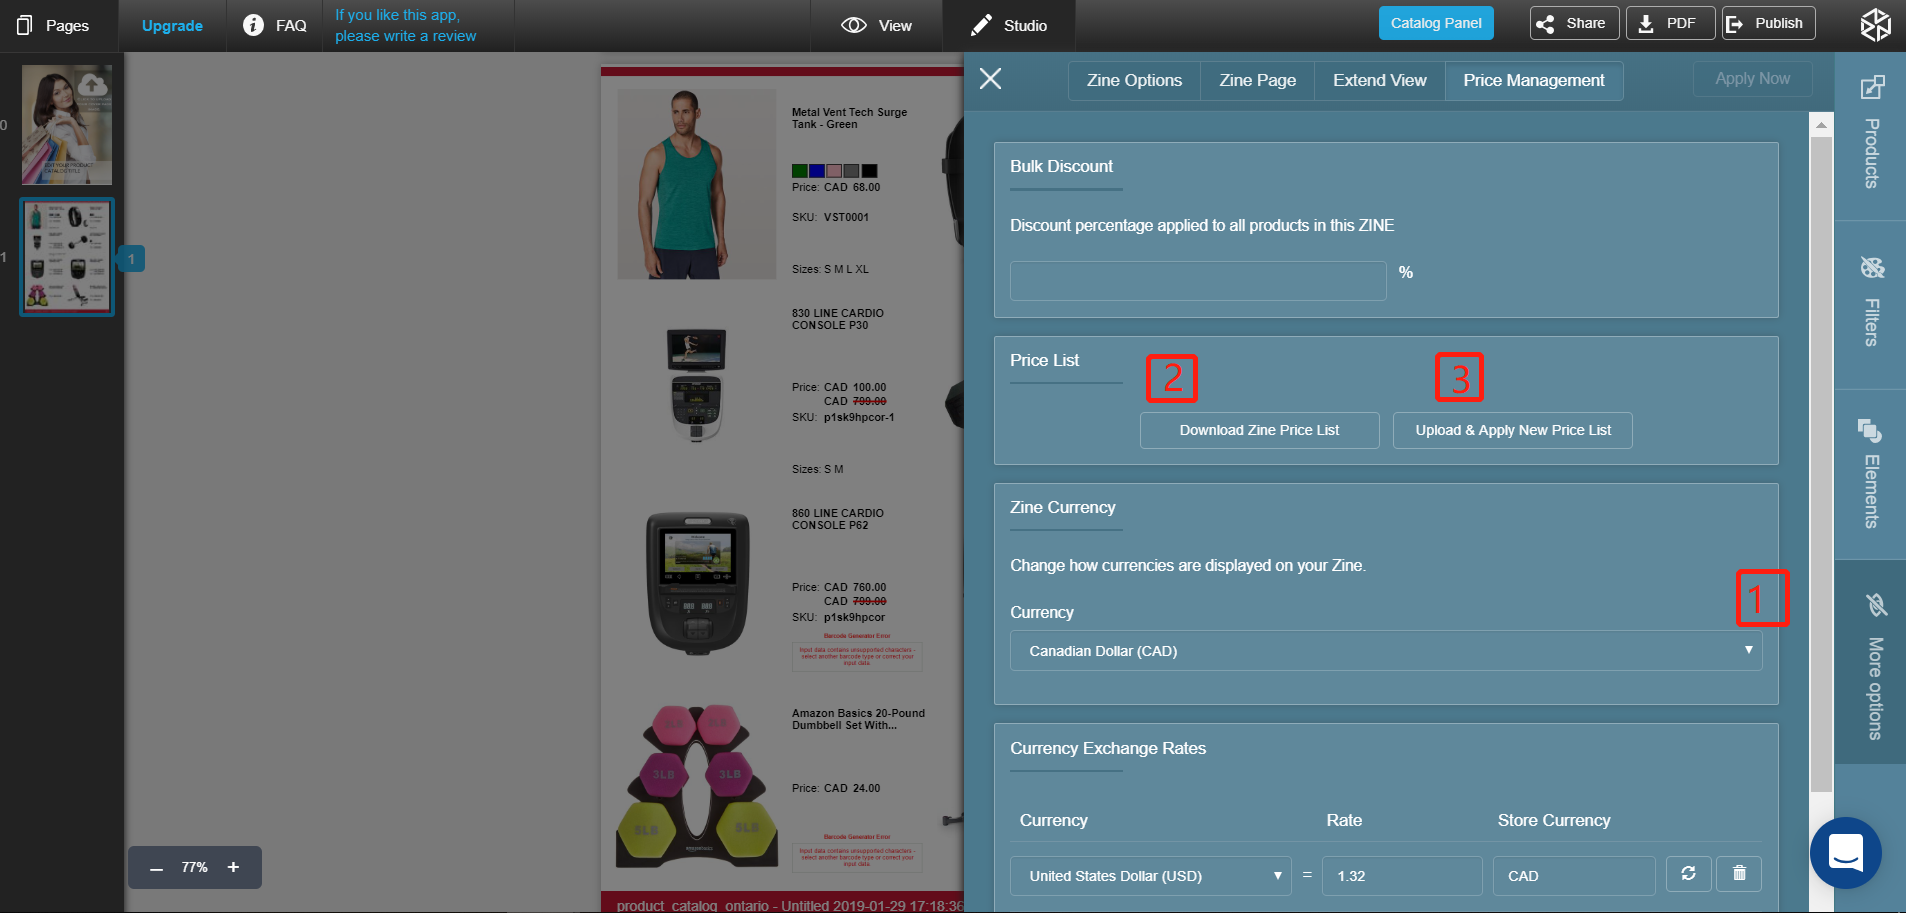
[/vc_column_text][/vc_tta_section][vc_tta_section title=”How do I convert currency to multi-currencies?” tab_id=”1484854726616-7406a003-4e65″][vc_column_text]• Click on More Options in the right sidebar
• Click on Price Management, scroll down to set exchange rate and choose the currency
• Click Apply Now
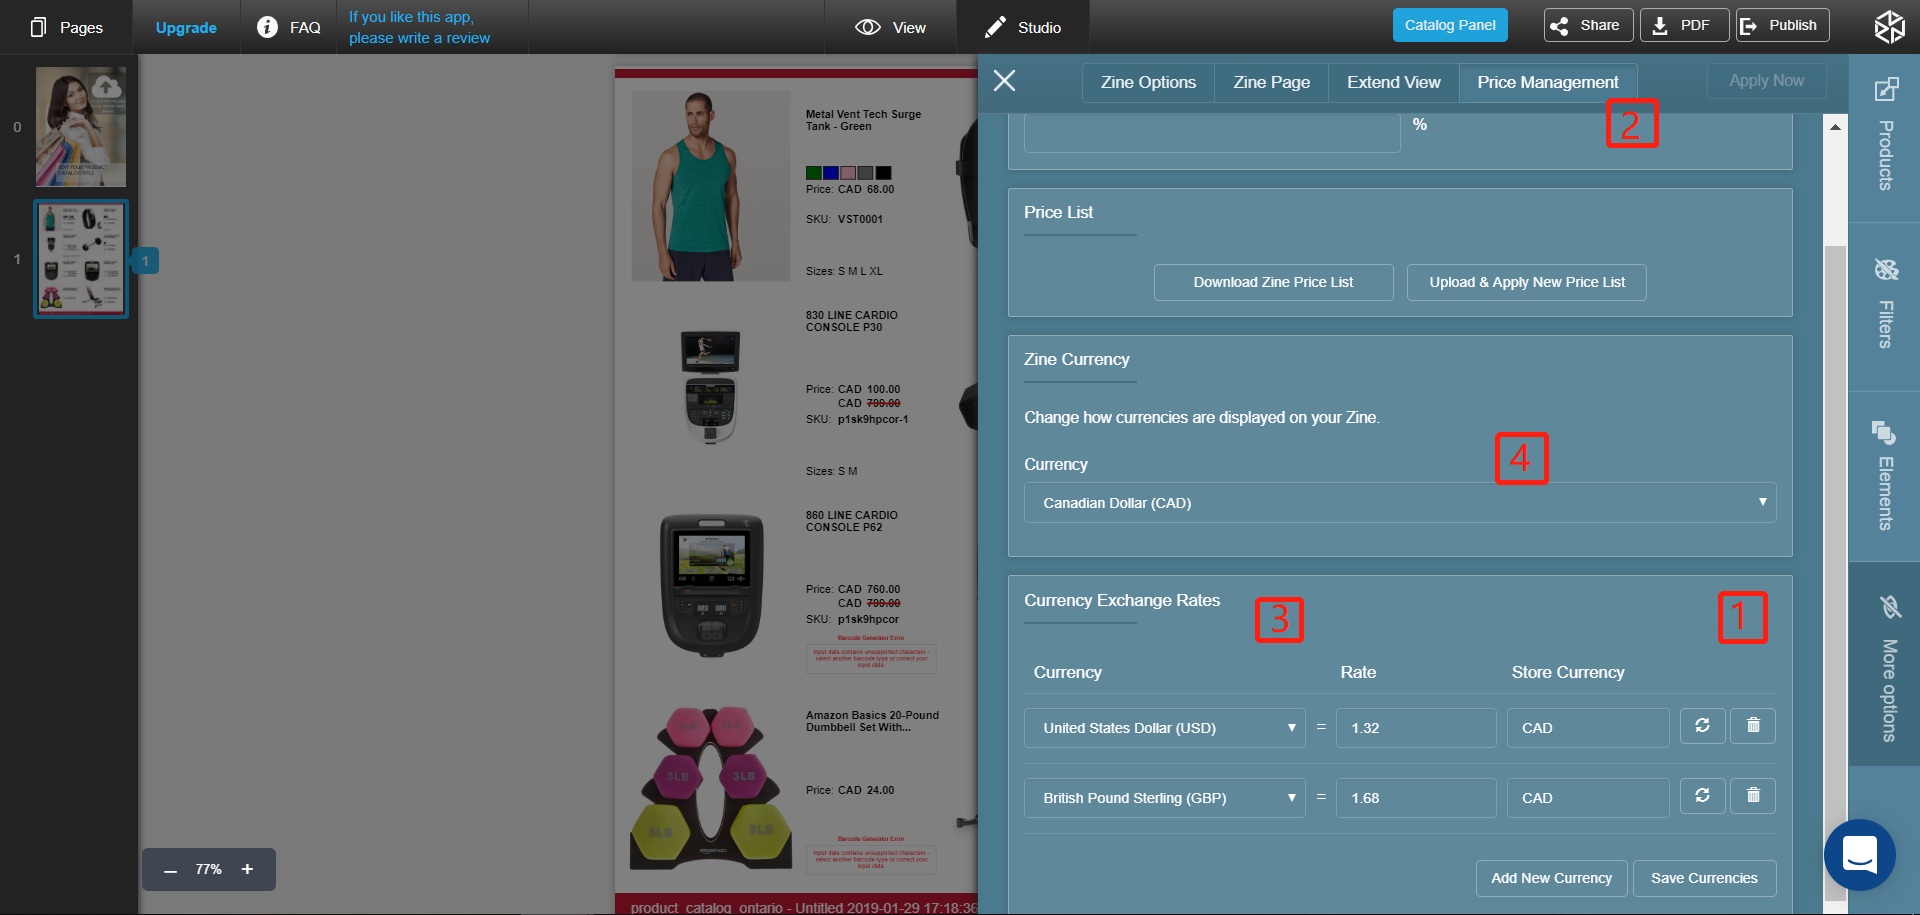
[/vc_column_text][/vc_tta_section][vc_tta_section title=”How do I download a high resolution PDF of my catalog?” tab_id=”1484771623126-15de9178-0551″][vc_column_text]• While creating or editing a catalog in your Studio, click on “PDF” icon in the top right of your screen and click Generate PDF
• A PDF will begin generating for you and will be available for you to Download PDF shortly in the same “PDF” icon – an email of your PDF will also be sent to the email address you use for your ZINation account
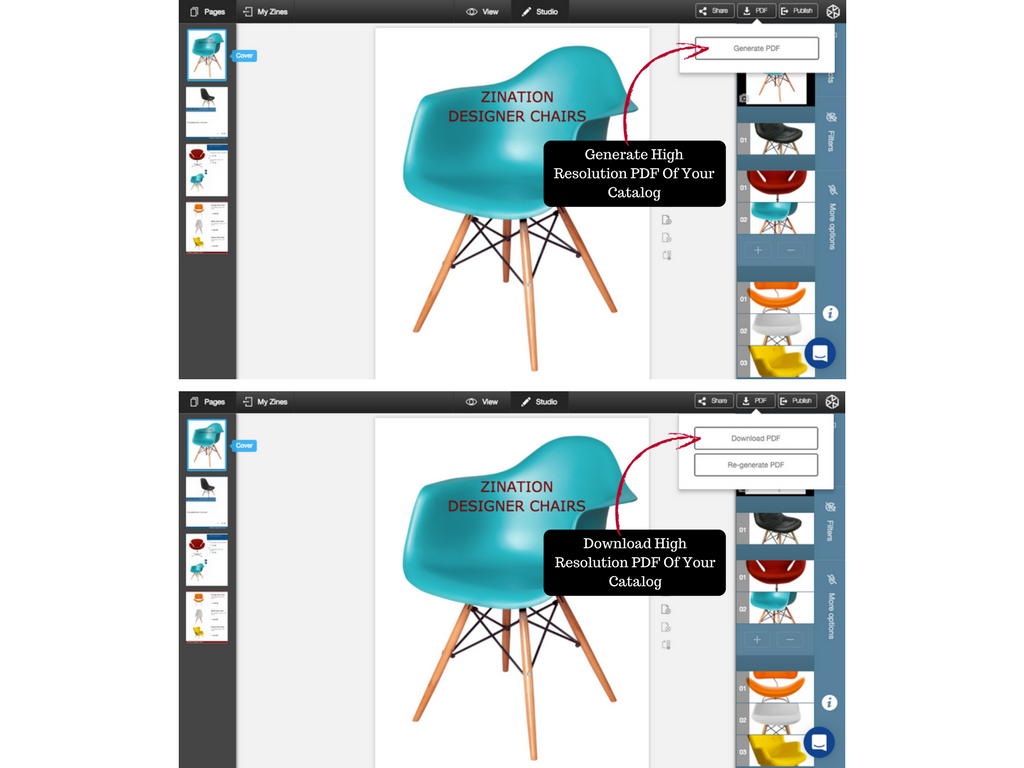 [/vc_column_text][/vc_tta_section][vc_tta_section title=”How do I delete cover page?” tab_id=”1552424224939-b8642f39-871a”][vc_column_text]• Please click on Catalog Panel –> LIVE CATALOG –> Show Cover Page –> Disable.[/vc_column_text][/vc_tta_section][vc_tta_section title=”How do I give access to my sales reps?” tab_id=”1554404683704-0e30080b-dc1a”][vc_column_text]First please publish your catalog.
Then open your ZINation store front at the left side navigation bar and share the URL with your sales reps. They can view, share, and download the catalog, or order directly inside the catalog.
[/vc_column_text][/vc_tta_section][vc_tta_section title=”What browser brings better user experience?” tab_id=”1484773752423-7ffbc7df-471a”][vc_column_text]We suggest Google Chrome for you because other browsers might cause error when you create and edit the catalog.[/vc_column_text][/vc_tta_section][vc_tta_section title=”How do I view my catalog?” tab_id=”1550594224745-cbb14b5a-40d2″][vc_column_text]• To view your catalog while editing in your Studio, click on View at the top of the page
• To view a catalog that has already been completed, go to My Zines, click on three white dashes on the catalog you want to view and choose the view icon (eye)[/vc_column_text][/vc_tta_section][vc_tta_section title=”How do I change the way my catalog is viewed (vertical or horizontal)?” tab_id=”1484773976053-fc3c654e-37e6″][vc_column_text]• While in your Studio editing your catalog, open the Display Options tab on the right side of your screen and select your Zine View Mode[/vc_column_text][/vc_tta_section][vc_tta_section title=”How do I publish & share my catalog?” tab_id=”1484772460637-22a34014-1f6a”][vc_column_text]Publishing
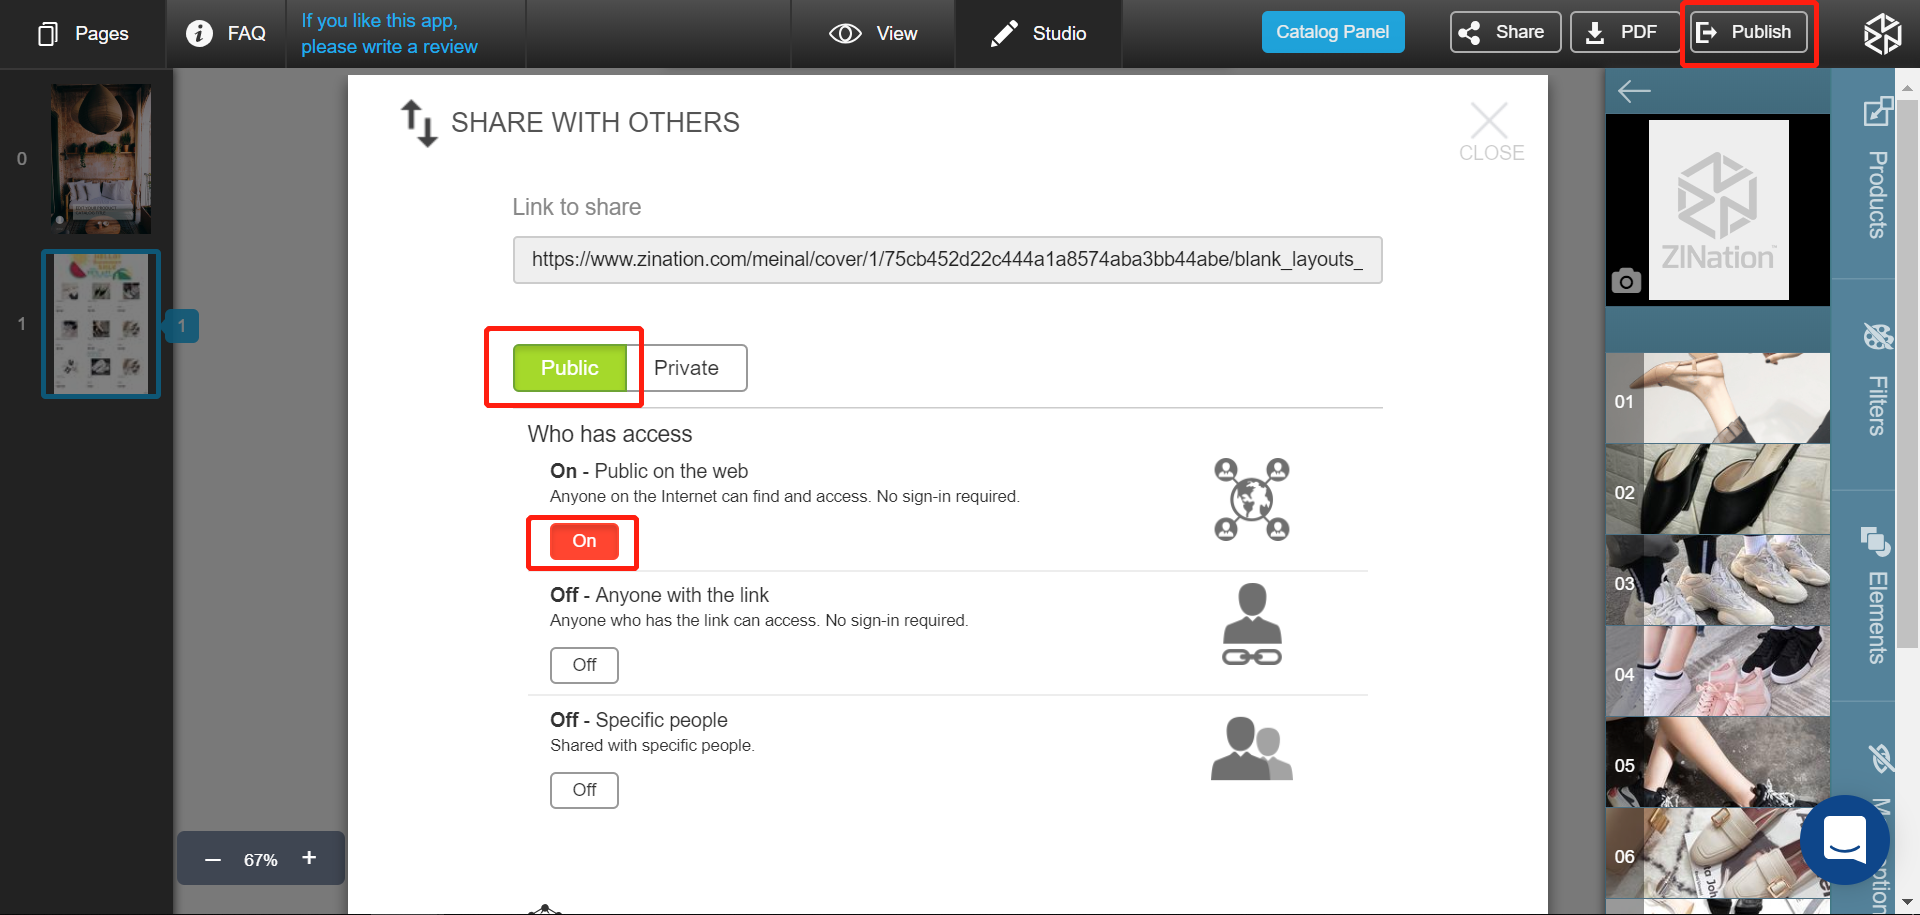
• While creating or editing a catalog in your Studio, click on Publish in the top right of your screen and switch your catalog from Private to Public, this will put your catalog on your Storefront and be available to anyone on the web
Sharing
• To share your catalog with customers, make your catalog Public then choose 1 of 2 options:
1 – Anyone With the Link – copy the Link To Share and share this unique URL
2 – Specific People – Invite People to see your catalog using their email address, then Fill Code Name to provide them with an access code to view your catalog (secure sharing)[/vc_column_text][/vc_tta_section][vc_tta_section title=”How do I duplicate my catalog? ” tab_id=”1484772599542-8137163e-22a5″][vc_column_text]
- In My Zines, click on the 3 white dashes on the catalog you want to duplicate and choose the “copy” icon – this will make an exact copy of this catalog
[/vc_column_text][/vc_tta_section][vc_tta_section title=”How do I edit a catalog once it’s published?” tab_id=”1484773383322-603dac93-0e4c”][vc_column_text]
- From My Zines, click on the three white dashes on the bottom right corner of the catalog you want to edit and choose the edit icon (crayon) – you will now been in your Studio where you can edit your catalog
[/vc_column_text][/vc_tta_section][vc_tta_section title=”What is ZINation Studio?” tab_id=”1484945692514-887320a0-6de3″][vc_column_text]
- Studio is where you create and edit catalogs. When you begin creating a catalog or open a catalog by the edit icon, you are brought to your Studio.
[/vc_column_text][/vc_tta_section][vc_tta_section title=”How do I edit a product in my PIM (Product Information Management)?” tab_id=”1484772898378-ba11ac5a-bf39″][vc_column_text]• From your Dashboard, click on the 3 white dashes in the top left and choose My Products – this is your PIM (Product Information Management system)
• To edit any component of a product, click on the Product Name
• Here you can edit the Product Name, Description, Type, Vendor or Image
• You can also edit or add a Variant (SKU, Weight, Weight Unit, Price and Compare at Price)[/vc_column_text][/vc_tta_section][vc_tta_section title=”How do I delete a catalog? ” tab_id=”1484774227050-b9d44272-2b4b”][vc_column_text]
- Go to My Zines and click on the three white dashes on the catalog you wish to delete and choose the delete icon (trash can)
[/vc_column_text][/vc_tta_section][vc_tta_section title=”How do I switch between my different ZINation Apps?” tab_id=”1484938020452-8adbae81-969c”][vc_column_text]
- While in your Dashboard or My Zines, at the top of your page the App you are currently using will be stated – click on the App title and a drop down menu will appear to choose another App
[/vc_column_text][/vc_tta_section][vc_tta_section title=”How do I embed a catalog into my website?” tab_id=”1484772602761-92cf2afd-ddc3″][vc_column_text]• Select the catalog you want to embed from your My Zines and click on the edit icon within the image of the catalog
• Click the “share” icon at the top of the screen and decide if you want your catalog embedded as an iFrame or Popup (iFrame will allow customers to stay on the original web page with the catalog loading inside an iFrame – Popup will load a popup window – If customers close the popup window, they see the previous web page again)
• Customize the the dimensions of the embedded catalog in percentage or pixels (We recommend keeping 100% of the resolution for a quality viewing experience)
• Check off “Force one page navigation”
• Check off “Transparent background”
• Copy the code and Paste it into your website builder
Please check tutorial here https://bit.ly/2MxoWM1 [/vc_column_text][/vc_tta_section][vc_tta_section title=”What quality will the PDF of my catalog be?” tab_id=”1484942889888-8b2e3b9f-b2db”][vc_column_text]
- 300 DPI print-friendly PDF (high quality)
[/vc_column_text][/vc_tta_section][vc_tta_section title=”How many pages can I put in a catalog?” tab_id=”1484847135216-100aa7ed-77db”][vc_column_text]
- You can have a maximum of 256 pages per catalog
[/vc_column_text][/vc_tta_section][vc_tta_section title=”How to get catalogs into my Storefront (Public)?” tab_id=”1484774372331-3efcfdd8-ba25″][vc_column_text]• While editing your catalog in your Studio, click on Publish at the top of your screen and choose Public
• Choose Public on the web (Anyone on the Internet can find and access. No sign-in required.)[/vc_column_text][/vc_tta_section][vc_tta_section title=”How do I brand my Storefront & catalogs?” tab_id=”1484768051111-c4d512a4-2f46″][vc_column_text]Your Storefront is your public space to display your Zines (catalogs, flyers, lookbooks and linesheets). A Zine will be in your Storefront once you make it Public. You can brand your Storefront with your logo, a banner and a background image
• From your Dashboard, click on the three white dashes in the top left of your screen to open the Menu
• Choose Account Settings then Branding and add your own logo, Storefront Banner and Storefront Background image[/vc_column_text][/vc_tta_section][vc_tta_section title=”How do I create a LookBook?” tab_id=”1484846438306-e57b3f32-085f”][vc_column_text]To create a LookBook you require the Easy LookBook Creator App from ZINation.
• From your Dashboard, click on “Create a…” LookBook
• Choose what kind of LookBook you want to create (Magazine LookBook, Web Embedded LookBook or Social LookBook)
• You will be prompted to create your Cover Page by adding an Image and Zine Title
• Once you choose Create, you will be to add the rest of the pages of your LookBook by choosing Add Page at the bottom of your screen
• Add an image to your page by choosing Select Image, Upload Image or Add URL[/vc_column_text][/vc_tta_section][vc_tta_section title=”How do I tag a LookBook with a product?” tab_id=”1484846639367-f7ae552c-fed6″][vc_column_text]• After you add an image to your page, you can tag your image with a product from your PIM (Product Information Management) by choosing Tag Image and clicking anywhere on the image to add a tag
• Choose a product from your PIM and click Apply
• Your tag will be clicked on by customers allowing them to see the product details and will have a Buy Now button that link back to your eCommerce store[/vc_column_text][/vc_tta_section][vc_tta_section title=”How do I see my subscription with ZINation?” tab_id=”1484772944181-c94e77ac-fe87″][vc_column_text]
- On your Dashboard you will see Your Subscription – Here you can see what plan you are subscribed to, the number of Zine Pages you have created, how many Zines you have created, and how many more Zine Pages you can create under your current subscription
[/vc_column_text][/vc_tta_section][vc_tta_section title=”How do I upgrade my account?” tab_id=”1484773098728-93a75201-2ade”][vc_column_text]
- On your Dashboard you will see Subscriptions – to upgrade to a subscription that allows you to create more Zine Pages, click Upgrade Now
[/vc_column_text][/vc_tta_section][vc_tta_section title=”How do I change my password?” tab_id=”1484847051135-54b1df5a-a7d2″][vc_column_text]• From your Dashboard, click on the three white dashes in the top left corner and choose Account Settings then Your Login
• Scroll down to Password, enter your Current Password then your New Password and click Change Password[/vc_column_text][/vc_tta_section][/vc_tta_accordion][/vc_column][/vc_row][vc_row][vc_column width=”1/4″][/vc_column][vc_column width=”1/4″][vc_empty_space][vc_btn title=”Magento Apps” style=”custom” custom_background=”#6f0909″ custom_text=”#ffffff” size=”lg” align=”center” link=”url:http%3A%2F%2Fabout.zination.com%2Fmagento-apps%2F||”][vc_empty_space][/vc_column][vc_column width=”1/4″][vc_empty_space][vc_btn title=”Shopify Apps” style=”custom” custom_background=”#6f0909″ custom_text=”#ffffff” size=”lg” align=”center” link=”url:http%3A%2F%2Fabout.zination.com%2Fshopify-apps%2F||”][vc_empty_space][/vc_column][vc_column width=”1/4″][/vc_column][/vc_row]